lession1
检测逻辑
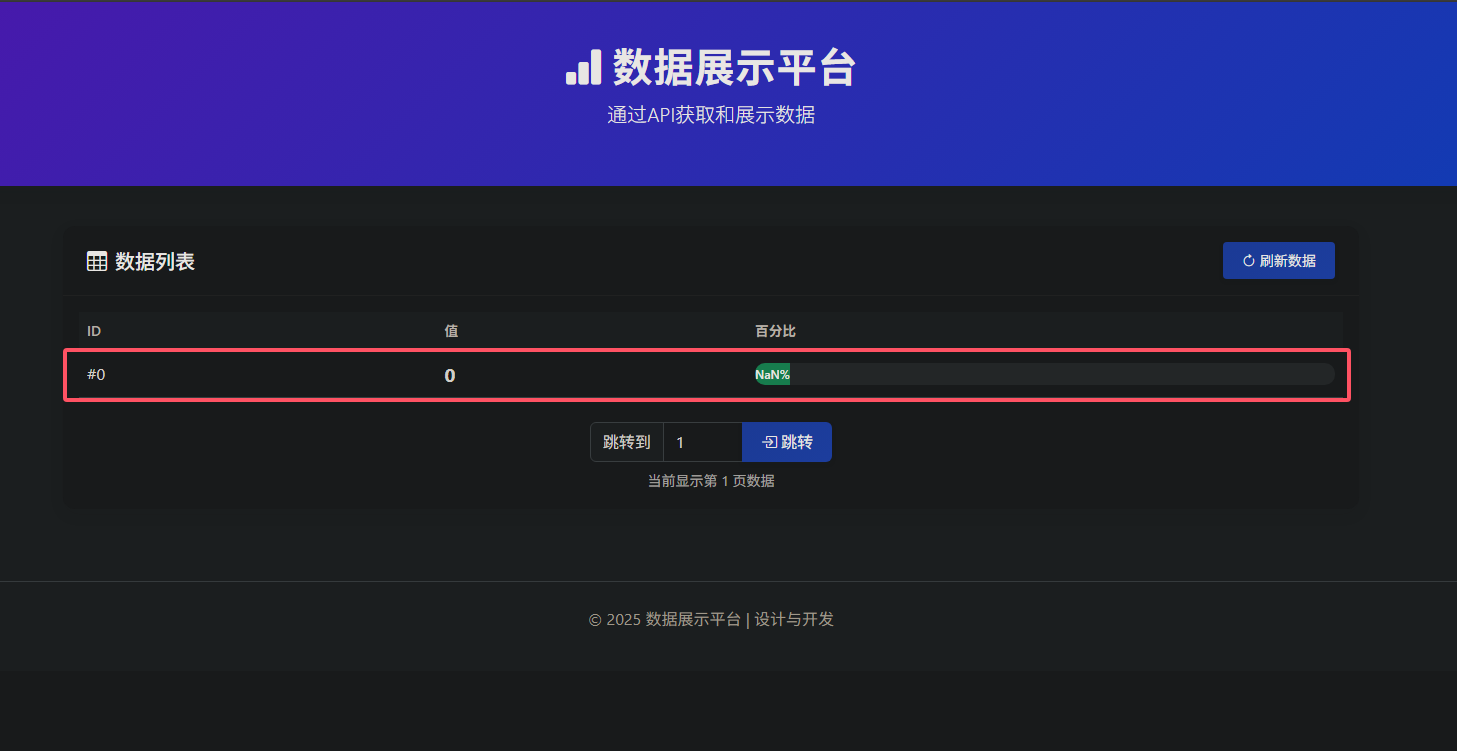
目的是找出有数据的页面
通过浏览器是可以正常访问的
![image]()
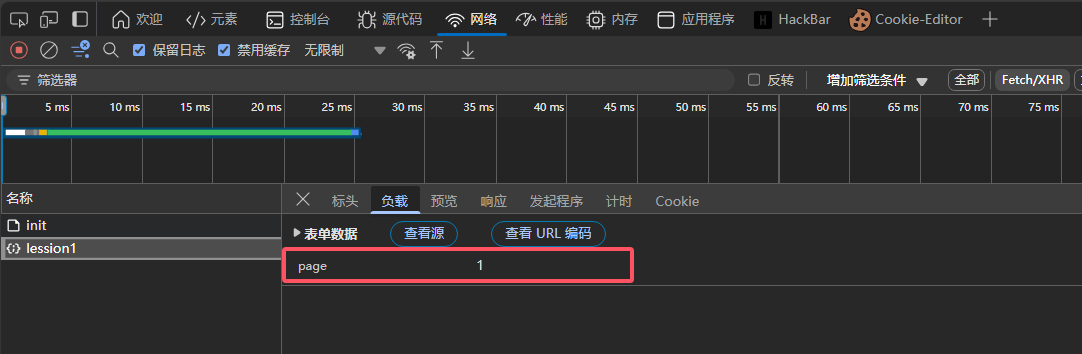
并且通过Devtools可以发现会向lession1发送POST数据包
数据为page=X
![image]()
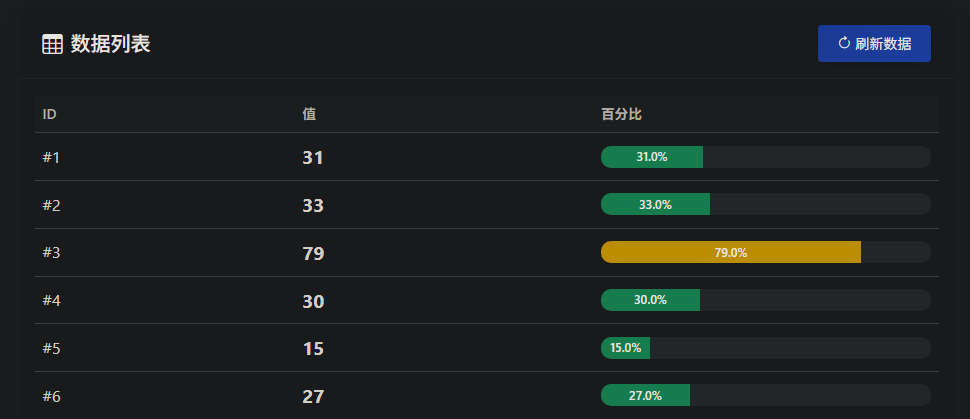
正常逻辑是通过Burpsuite进行抓包重放爆破page,过滤返回包长度即可
随便尝试一下,发现第一页是存在数据的
![image]()
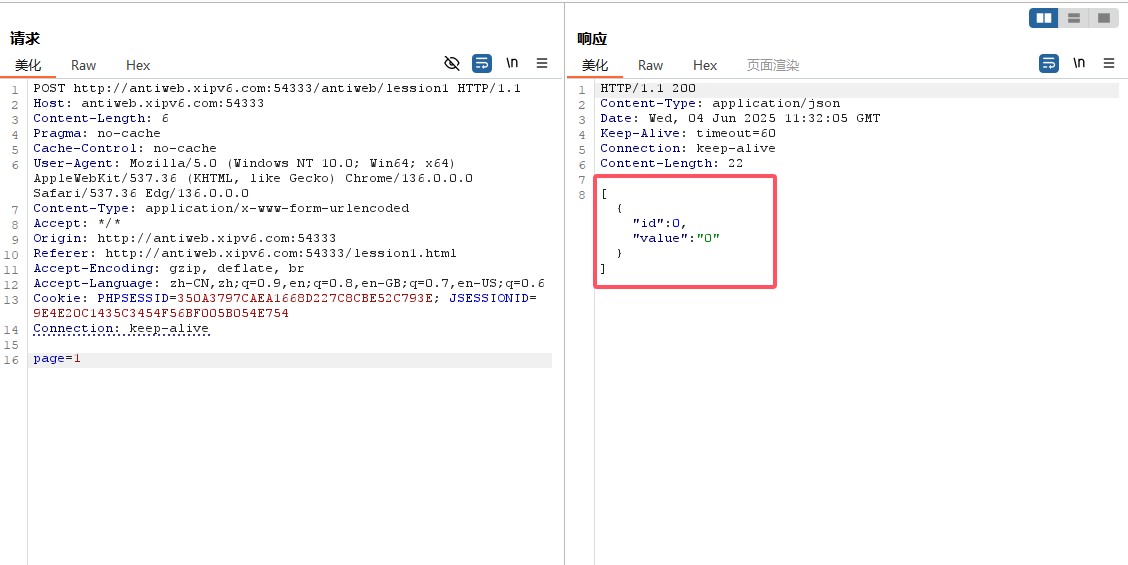
然而当你通过Burpsuite重放请求包
会发现返回数据为空
![image]()
这是为什么,猜测后端进行了反自动化工具的检测或者说禁止无头浏览器进行访问
不过观察仔细可以发现在lession1数据包发送前还发送了一个init包
而你抓包有时候会lession1包在前,init包在后
但通过浏览器进行访问,肯定都是init包在前
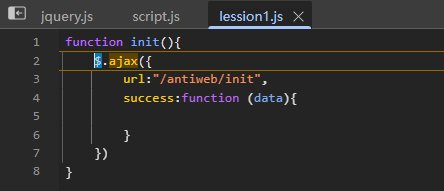
查看script.js源代码,会发现在loadData函数调用时
一开始就调用init()然后才是lession1的POST数据包
![image]()
在init()处下个断点,F11单步执行下个函数调用,可以发现此函数定义访问了/antiweb/init
![image]()
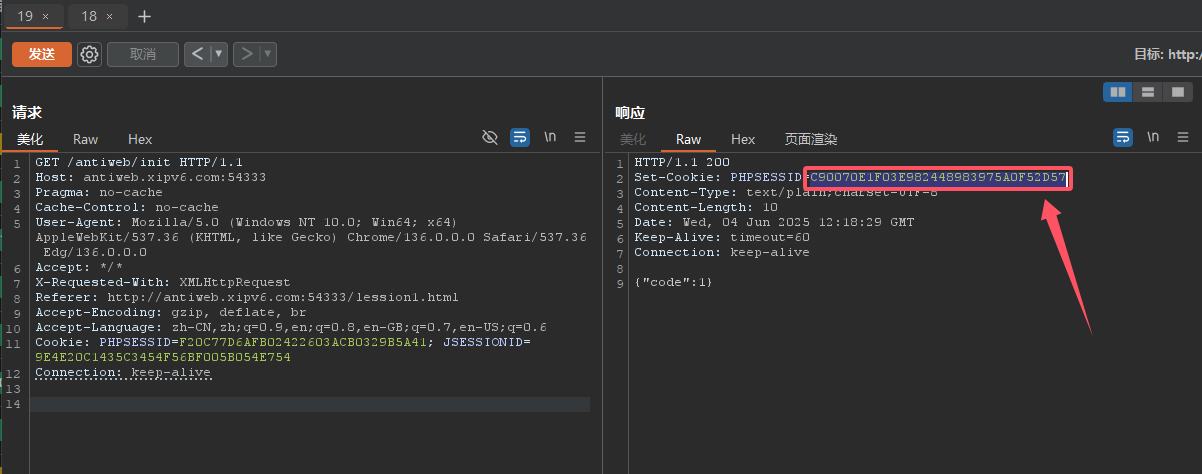
我们访问一下/antiweb/init会发现响应{"code":1}
![image]()
并且会设置一个Cookie值set-cookie
![image]()
所以我们可以模拟浏览器跳转页面的行为,先访问/antiweb/init再向lession1发POST数据包
Burp Repeater(模拟单个流程)
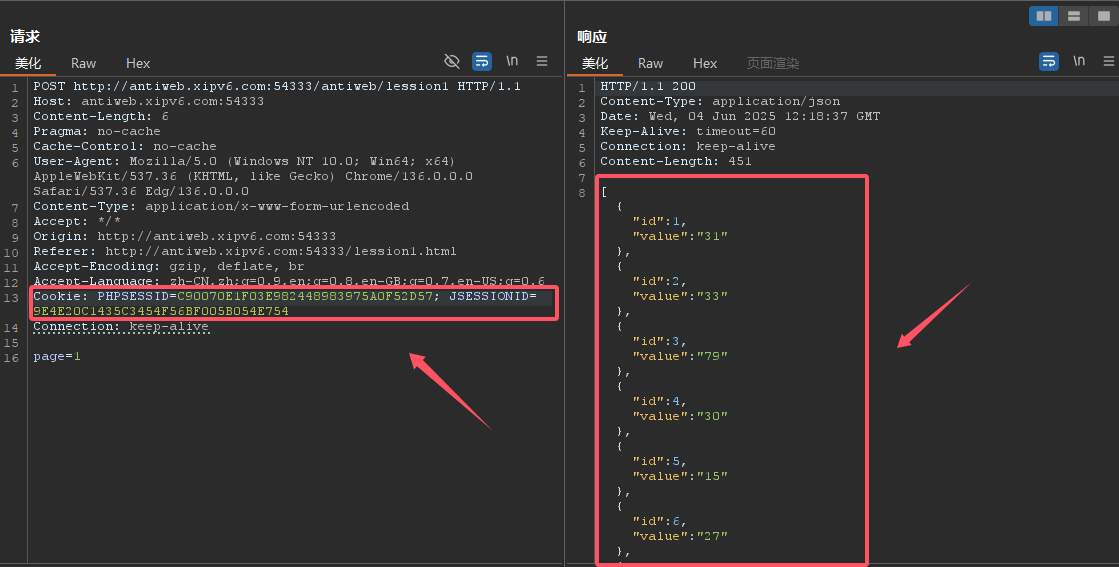
将Cookie的值复制到POST发包的请求头中
![image]()
只要PHPSESSID相同即可,再次发包就能显示数据了
![image]()
不过我们是需要枚举出有数据的页面,这么手工测那还不如直接浏览器中慢慢跳转过去
Burp Intruder(自动化批量测试)
利用Burpsuite的Macros宏可以实现自动化批量测试
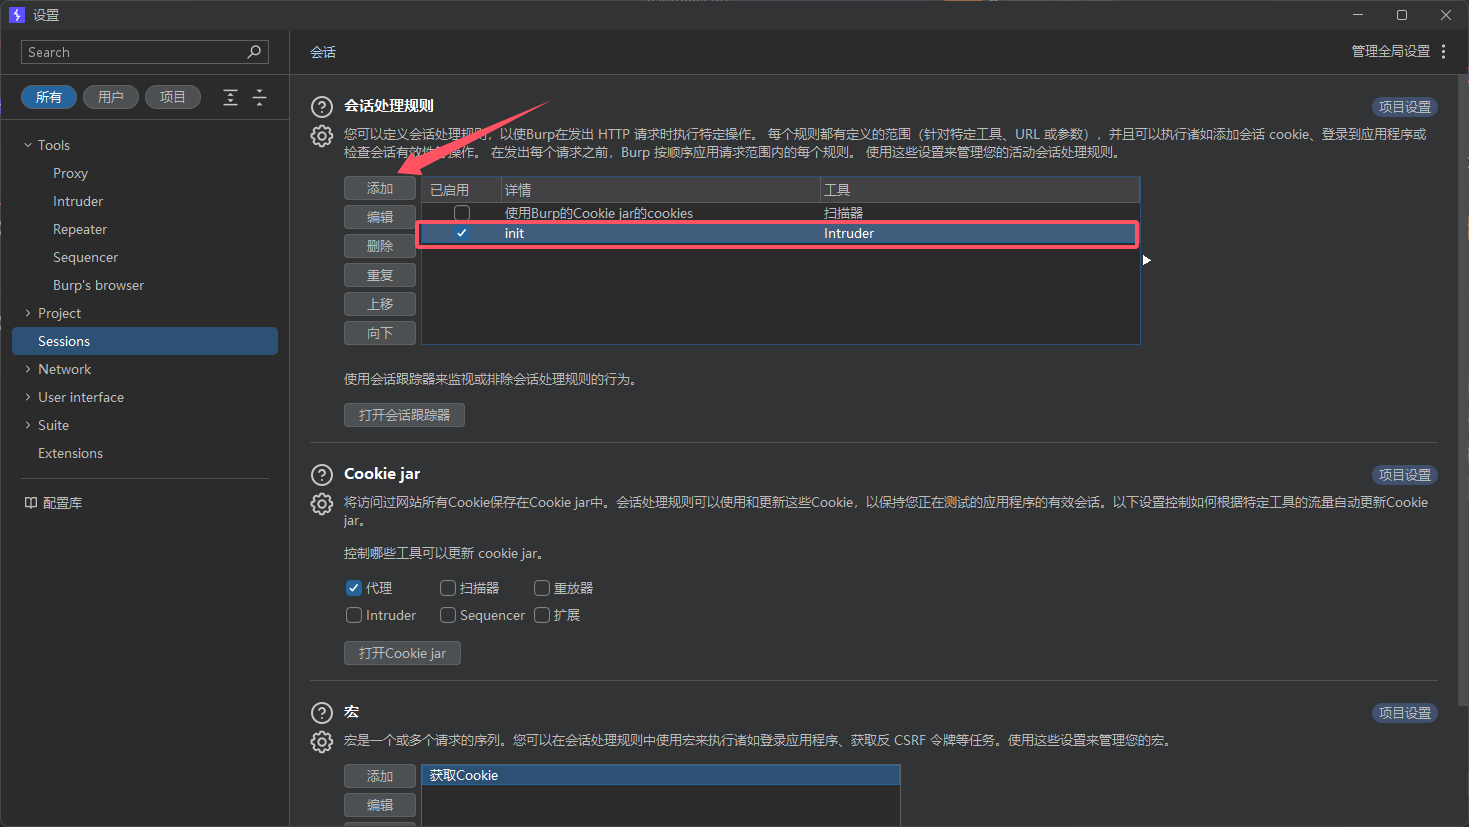
- 添加会话处理规则(Session Handling Rule)
![image]()
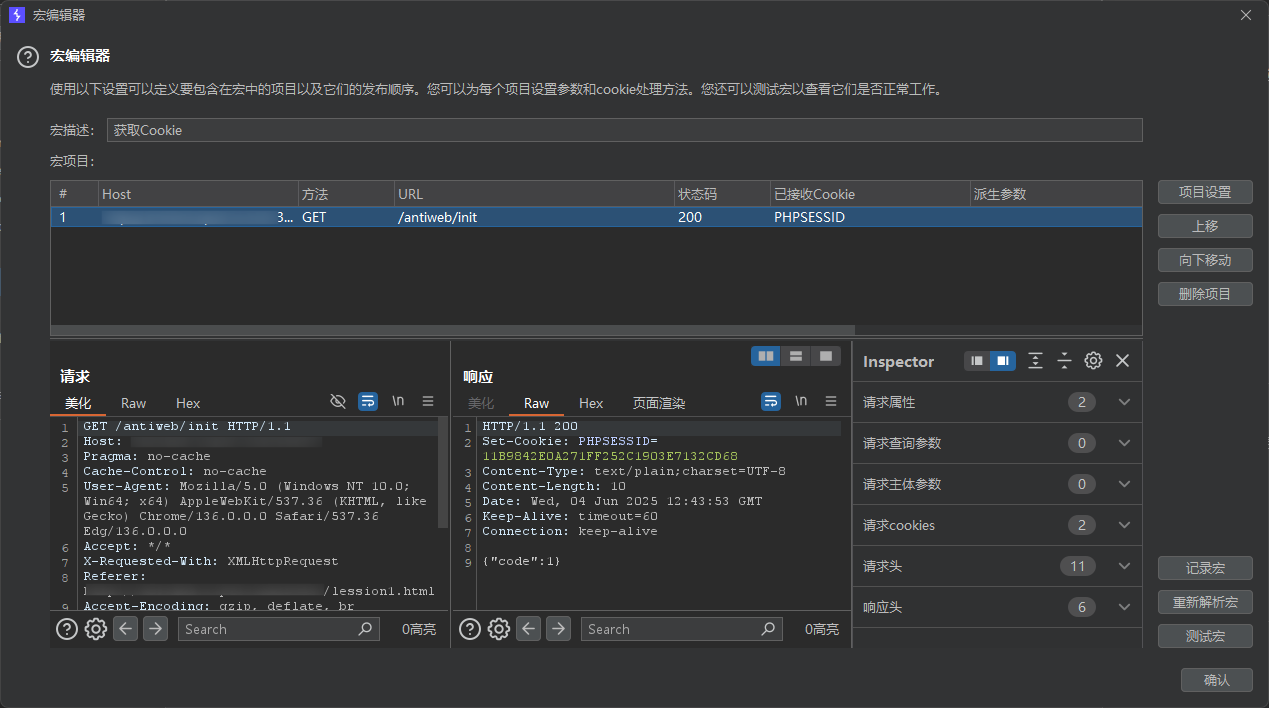
添加定义宏
![image]()
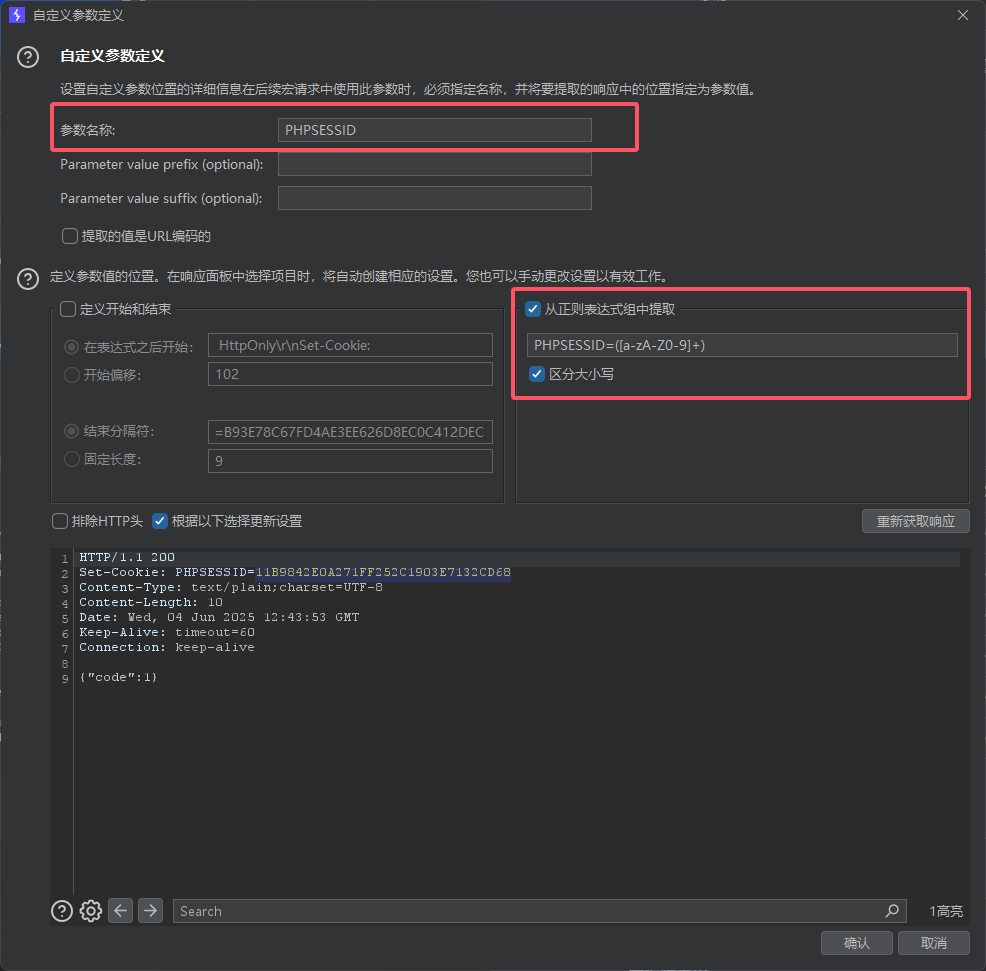
宏编辑器-自定义参数
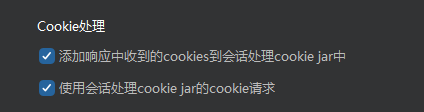
设置Cookie处理
![image]()
需要设置根据以下选择更新设置✔️
![image]()
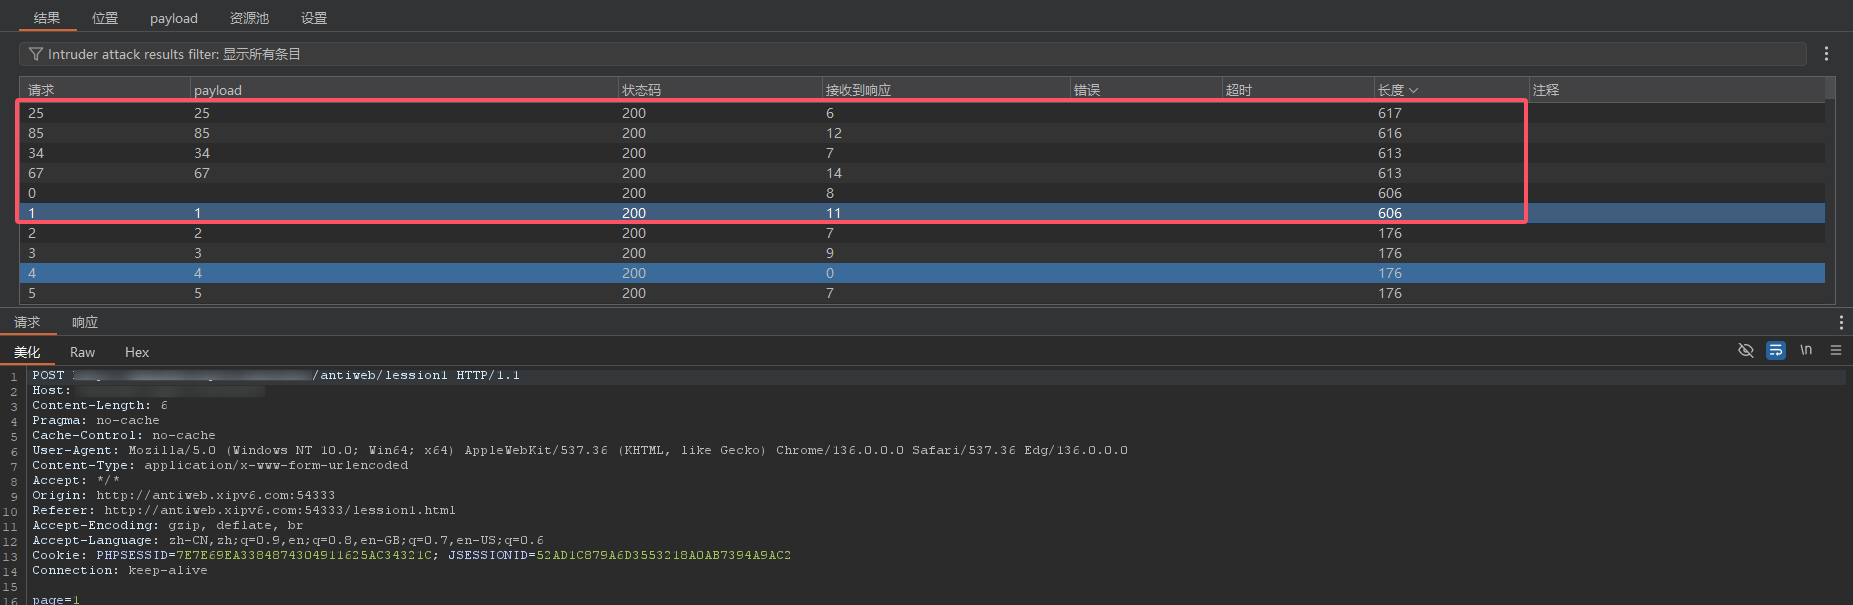
添加payload攻击即可
1
2
3
4
5
6
| ❯ seq 100
1
2
3
4
………………
|
所以有数据的页面是1 25 34 67 85
![image]()
Mitmproxy
其实还有个很强大的工具可以修改请求进行重放
mitmproxy - an interactive HTTPS proxy
直接安装即可,好像会自动添加到环境变量,可以直接调用
使用 Python 脚本进行自动化 (Addons)
获取Cookie后自动修改请求头
1
2
3
4
5
6
7
8
9
10
11
12
13
14
15
16
17
18
19
20
21
22
23
24
25
26
27
28
| import requests
def getCookie():
resp = requests.get("http://xxxxx.xxx:54333/antiweb/init")
cookie = resp.headers.get("Set-Cookie")
print("获取到的Set-Cookie:", cookie)
return cookie.replace("HttpOnly,", "")
class Recorder:
def requestheaders(self, flow):
pass
def request(self, flow):
flow.request.headers["Cookie"] = getCookie()
print("请求头:", flow.request.headers)
def response(self, flow):
pass
def error(self, flow):
print(f'HTTP Error With [{flow.response.reason}], and body: {flow.response.text}')
addons = [
Recorder()
]
|
- 核心事件钩子:
request(flow): 请求发出前。response(flow): 响应返回前。error(flow): 发生错误时。load(loader): mitmproxy 启动时。done(): mitmproxy 关闭时。
请求发出前,设置在getCookie函数中请求的 Cookie 头部
这意味着每个通过代理的请求都会带上一个新的从 xxxxx.xxx 获取的 Cookie
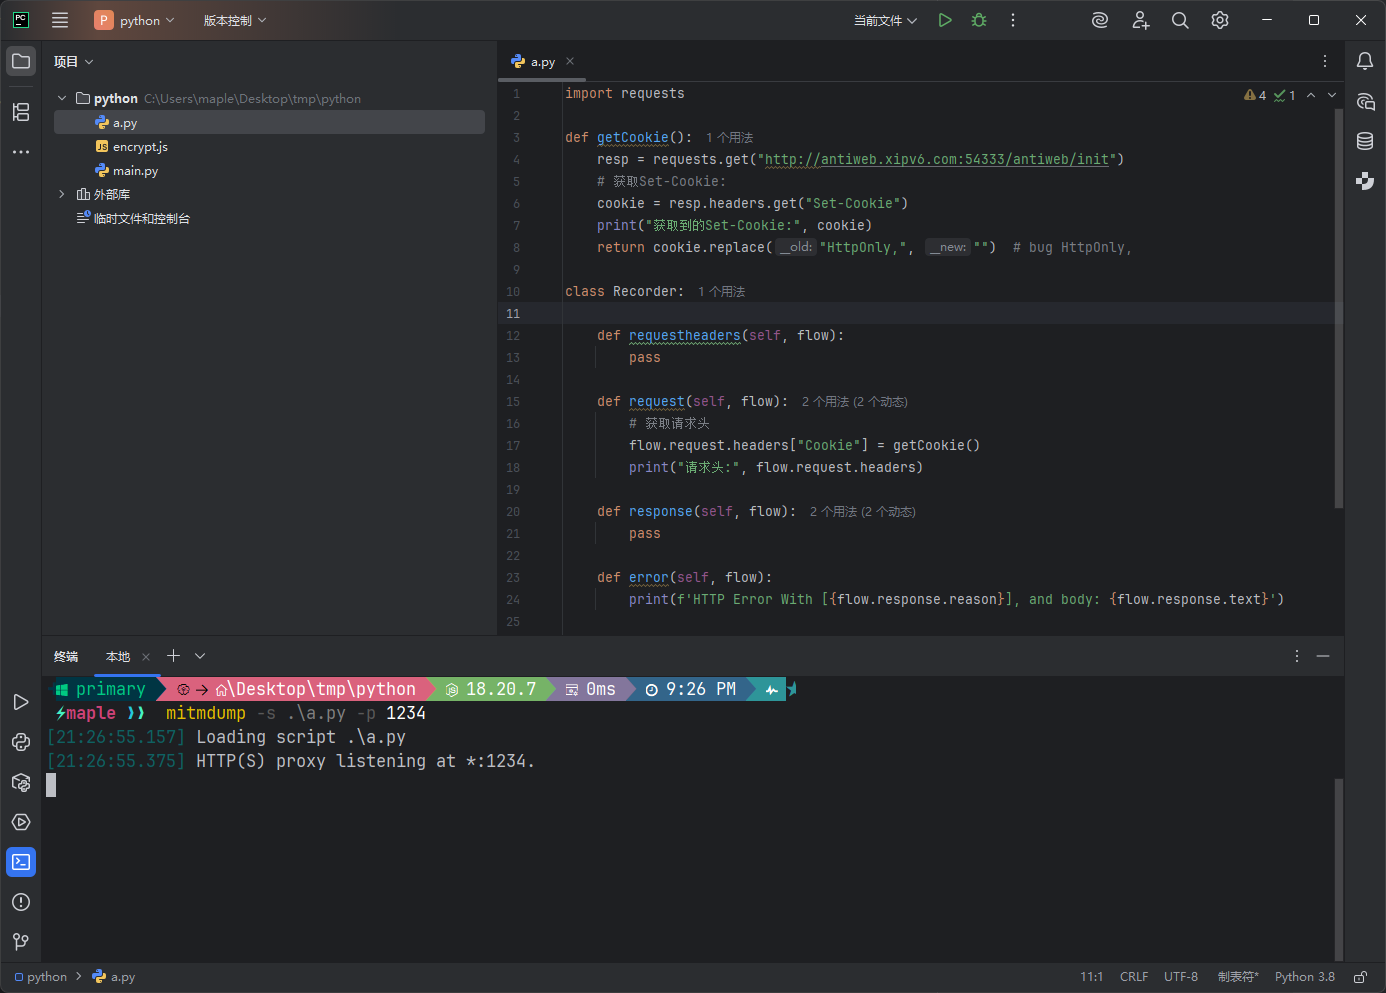
利用mitmdump开个1234端口
![image]()
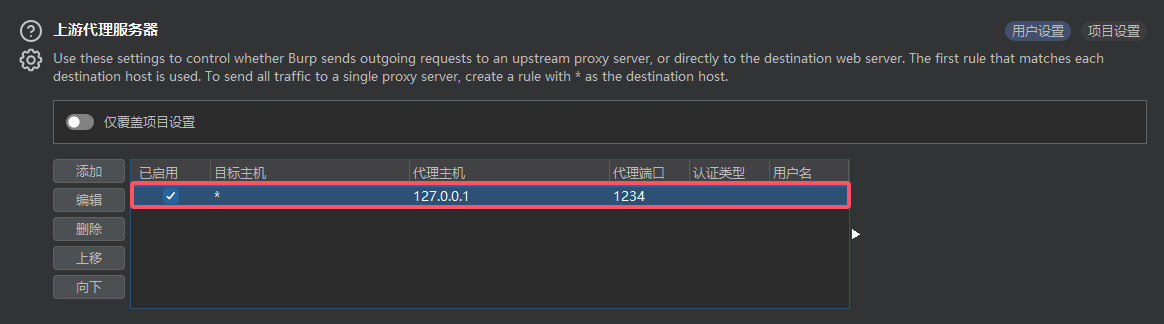
在Burpsuite中设置上游代理服务器
![image]()
正常重放攻击即可,不过Burpsuite的请求头中不会显示Cookie发生了变化,这是正常的
因为通过burpsuite向上游服务器发包后都交由mitmdump处理后再返回到Burpsuite正常遍历page
![image]()
lession1
检测逻辑
同样的也是会先请求init初始化后
然后再请求lession2
不同的是你会发现POST包中的body是一串十六进制
疑似加密了
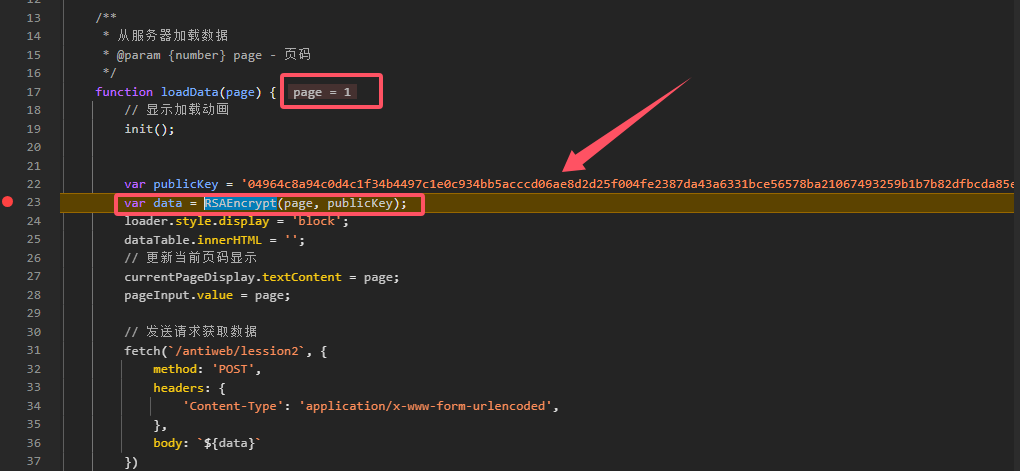
![image]()
可以看到在传入page=1后利用RSAEncrypt函数对其1进行了加密
并且公钥是明文存储在js中的
![image]()
这里我直接面向答案解题🤣
我问老师拿到源码后,分析了下,得知RSA.js并不是真的RSA加密
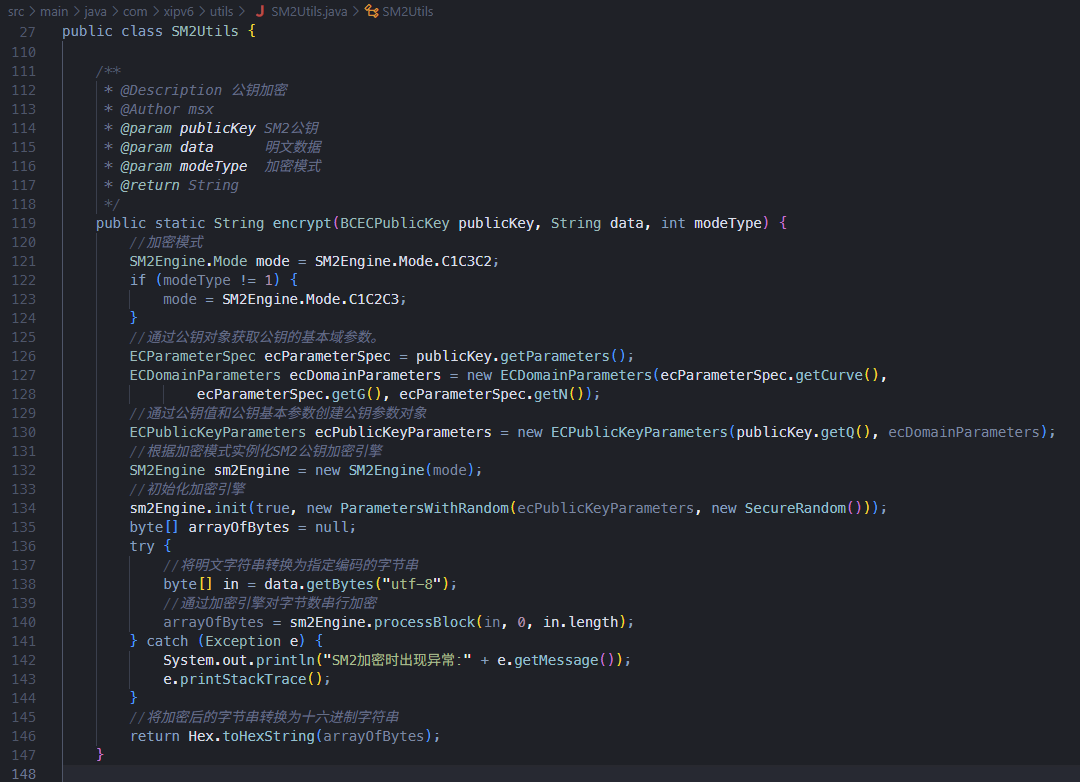
后端实际用的是国密 SM2 算法进行解密
拿到前端传过来的十六进制数后先利用私钥进行解密再进行Base64解码
再将这个赋予给page参数
![image]()
所以我们已经得到其解密流程,那么逆向一下,先Base64后再复用SM2加密算法即可
而作为没有源码的情况下,我们可以通过复用混淆后的RSA.js代码进行sm2加密
需要仔细观察内部的调用链,观察混淆的js调用了哪些函数
![image]()
后续一系列,看不懂
哎呀,卧槽😅太难了,看的我头皮发麻,js代码太恶心了
直接面向答案编程,哈哈哈
既然知道了是SM2加密,那直接调用SM2的python库实现加密
以确保生成的密文传入后端可以被后端正常解密
然而怎么改都有bug,通过在线加解密网站SM2在线密解工具 SM2加密工具 国密2解密工具 - The X 在线工具
测试后我发现它和java算的结果是对得上的,后端可以正常解密,但是和python计算的结果有出入
不断的拷打GPT,我都怀疑这个gmssl官方库有问题了,难崩😅
sm2的跨语言对接,两边加解密都对不上,自己造个轮子
好在网上也有其他人有相同情况,终于有个可以正常使用的库
ww-rm/gmalg: 国密算法的纯 Python 实现.
1
2
3
4
5
6
7
8
9
10
11
12
13
14
15
16
17
18
19
20
21
22
23
24
25
26
27
28
29
30
31
32
33
34
35
36
37
38
39
40
41
42
43
44
45
46
47
48
49
50
51
52
53
54
55
56
57
58
59
60
61
62
63
64
65
66
67
68
69
70
71
72
73
74
75
76
77
78
79
| import base64
from gmalg.sm2 import SM2
class SM2UtilsPython:
PUBLIC_KEY_HEX_JAVA_FORMAT = "04821bdfcbe226071955a6eaf8123077411c1407dc15c09601d69dd6099347e2f78e7e25804efce9dd8157688c62aead7946e7b02edcb32215bf378fb8980927bf"
PRIVATE_KEY_HEX = "e644268b38f6805dfd45b237f592d0fd29c40f8da8df3533ec91cceeed553e06"
@staticmethod
def encrypt(data_str: str) -> str:
"""
SM2加密方法,与Java的encrypt方法逻辑对齐。
将明文字符串进行UTF-8编码,然后进行SM2加密,最后将密文转换为十六进制字符串。
使用C1C3C2模式(gmalg默认加密输出C1C3C2)。
"""
plain_data_bytes = data_str.encode("utf-8")
public_key_bytes = bytes.fromhex(SM2UtilsPython.PUBLIC_KEY_HEX_JAVA_FORMAT)
sm2_obj = SM2(pk=public_key_bytes)
encrypted_bytes = sm2_obj.encrypt(plain_data_bytes)
return encrypted_bytes.hex()
@staticmethod
def decrypt(cipher_data_hex: str, private_key_hex: str = PRIVATE_KEY_HEX) -> str:
"""
SM2解密方法,与Java的decrypt方法逻辑对齐。
将十六进制密文转换为字节串,然后进行SM2解密,最后将解密后的字节串转换为UTF-8字符串。
使用C1C3C2模式(gmalg默认解密)。
"""
cipher_data_bytes = bytes.fromhex(cipher_data_hex)
private_key_bytes = bytes.fromhex(private_key_hex)
sm2_obj = SM2(sk=private_key_bytes)
decrypted_bytes = sm2_obj.decrypt(cipher_data_bytes)
return decrypted_bytes.decode("utf-8")
if __name__ == "__main__":
number_to_encrypt = "15"
print(f"原始数字: {number_to_encrypt}")
base64_encoded_py = base64.b64encode(number_to_encrypt.encode('utf-8')).decode('utf-8')
print(f"Python Base64编码后: {base64_encoded_py}")
encrypted_number_py = SM2UtilsPython.encrypt(base64_encoded_py)
print(f"Python SM2加密后的结果: {encrypted_number_py}")
print("\n--- 验证Java加密结果能否被Python解密 ---")
java_encrypted_data_hex = "0465aa022bc046c707c5f2b0646e59028250d60d5be1f2b24f43380b3a84531ce6720ee9960ecab29026d952b9bff615d4873b5b0faf4d7a2d22648e27c39af90e762f3e75dcb55d3ca6318c570cb42a0ea08c23d66bffc41849d94b2fbbbd48c9f58be5cc"
decrypted_from_java_b64 = SM2UtilsPython.decrypt(java_encrypted_data_hex, SM2UtilsPython.PRIVATE_KEY_HEX)
print(f"Python SM2解密后的Base64字符串: {decrypted_from_java_b64}")
decrypted_from_java_original = base64.b64decode(decrypted_from_java_b64).decode('utf-8')
print(f"Python Base64解码后的原始数据: {decrypted_from_java_original}")
|
![image]()
经过测试gmalg和java的结果是一致的,那就可以放到mitmproxy的脚本里了
1
2
3
4
5
6
7
8
9
10
11
12
13
14
15
16
17
18
19
20
21
22
23
24
25
26
27
28
29
30
31
32
33
34
35
36
37
38
39
40
41
42
43
44
45
46
47
48
49
50
51
52
53
54
55
56
57
58
59
60
61
62
63
64
65
66
67
68
69
70
71
72
73
74
75
76
77
78
79
80
81
82
83
84
85
86
87
88
| import requests
import base64
from gmalg.sm2 import SM2
SM2_PUBLIC_KEY = "04821bdfcbe226071955a6eaf8123077411c1407dc15c09601d69dd6099347e2f78e7e25804efce9dd8157688c62aead7946e7b02edcb32215bf378fb8980927bf"
def getCookie():
try:
resp = requests.get("http://antiweb.xipv6.com:54333/antiweb/init", timeout=5)
resp.raise_for_status()
cookie = resp.headers.get("Set-Cookie")
if cookie:
first_cookie_part = cookie.split(';')[0].strip()
print(f"获取到的Set-Cookie: {first_cookie_part}")
return first_cookie_part
return ""
except requests.exceptions.RequestException as e:
return ""
def encrypt(data_str: str) -> str:
"""
SM2加密方法,与Java的encrypt方法逻辑对齐。
将明文字符串进行UTF-8编码,然后进行SM2加密,最后将密文转换为十六进制字符串。
使用C1C3C2模式(gmalg默认加密输出C1C3C2)。
"""
plain_data_bytes = data_str.encode("utf-8")
public_key_bytes = bytes.fromhex(SM2_PUBLIC_KEY)
try:
sm2_obj = SM2(pk=public_key_bytes)
encrypted_bytes = sm2_obj.encrypt(plain_data_bytes)
return encrypted_bytes.hex()
except Exception as e:
return ""
class Recorder:
def requestheaders(self, flow):
flow.request.headers["Cookie"] = getCookie()
print(f"[Recorder] 目标请求设置Cookie: {flow.request.headers.get('Cookie')}")
def request(self, flow):
number_to_encrypt = flow.request.content
if not number_to_encrypt:
return
print(f"原始数字: {number_to_encrypt}")
base64_encoded_bytes = base64.b64encode(number_to_encrypt)
base64_encoded_str = base64_encoded_bytes.decode('utf-8')
print(f"Python Base64编码后: {base64_encoded_str}")
encrypted_body_hex = encrypt(base64_encoded_str)
print(f"SM2加密后的Hex字符串: {encrypted_body_hex}")
flow.request.set_content(encrypted_body_hex.encode('utf-8'))
def response(self, flow):
pass
def error(self, flow):
print(f'HTTP Error With [{flow.response.reason}], and body: {flow.response.text}')
addons = [
Recorder()
]
|
Burpsuite发包即可,所以存在数据的页面是1 22 44 65 89
![image]()
后记
js逆向一时半会是学不会的,至于复用已经混淆的js生成前端密文,有能力再说吧👀
1
2
3
4
5
6
7
8
9
10
11
12
13
14
15
16
17
18
19
20
21
22
23
24
25
26
27
28
29
30
31
32
33
34
35
36
37
38
39
40
41
42
43
44
45
46
47
48
49
50
51
52
53
54
55
56
57
58
59
60
61
62
63
64
65
66
67
68
69
70
71
72
73
74
75
76
77
78
79
80
81
82
83
84
85
86
87
88
89
90
91
92
93
94
95
96
97
98
99
100
101
102
103
104
105
106
107
108
109
110
111
112
113
114
115
116
117
118
119
120
121
122
123
124
125
126
127
128
129
130
131
132
133
134
135
136
137
138
139
140
141
142
143
144
145
146
147
148
149
150
151
152
153
154
155
156
157
158
159
160
161
162
| package com.xipv6.controller;
import com.xipv6.domain.Lession1;
import com.xipv6.service.Lession1Service;
import com.xipv6.utils.MD5Utils;
import com.xipv6.utils.SM2Utils;
import jakarta.annotation.Resource;
import jakarta.servlet.ServletInputStream;
import jakarta.servlet.http.Cookie;
import jakarta.servlet.http.HttpServletRequest;
import jakarta.servlet.http.HttpServletResponse;
import jakarta.servlet.http.HttpSession;
import org.apache.tomcat.util.codec.binary.Base64;
import org.springframework.web.bind.annotation.*;
import java.io.IOException;
import java.security.NoSuchAlgorithmException;
import java.util.Collections;
import java.util.List;
import java.util.Random;
@RestController
@RequestMapping("/antiweb")
public class AntiWebController {
@Resource
private Lession1Service Lession1Service;
@GetMapping("/init")
public String init(HttpServletRequest request, HttpServletResponse response) throws NoSuchAlgorithmException {
HttpSession session = request.getSession();
session.getAttribute("Arvin");
Random rand = new Random();
int randomNum = rand.nextInt(10000) + 1;
String encode = MD5Utils.encode(String.valueOf(randomNum));
session.setAttribute("Arvin", encode);
Cookie cookie=new Cookie("PHPSESSID",encode.toUpperCase());
response.addCookie(cookie);
return "{\"code\":1}";
}
@PostMapping("/lession1")
public List<Lession1> antiWeb(HttpServletRequest request,@RequestBody String requestBody,@RequestParam("page") int page) {
List<Lession1> lession1=null;
HttpSession session = request.getSession();
String key=null;
Cookie[] cookies = request.getCookies();
if (cookies!=null) {
for (Cookie cookie : cookies) {
if ("PHPSESSID".equals(cookie.getName())) {
key = cookie.getValue();
break;
}
}
}else {
lession1= Collections.singletonList(new Lession1(0,"0"));
return lession1;
}
Object arvin = session.getAttribute("Arvin");
String verfy=arvin.toString().toUpperCase();
if (arvin==null||!verfy.equals(key)){
lession1= Collections.singletonList(new Lession1(0,"0"));
return lession1;
}else {
session.removeAttribute("Arvin");
}
if (page==1) {
lession1= Lession1Service.selectListByLimit(0, 20);
}else if (page==25){
lession1= Lession1Service.selectListByLimit(20, 20);
}else if (page==34){
lession1= Lession1Service.selectListByLimit(40, 20);
} else if (page==67) {
lession1= Lession1Service.selectListByLimit(60, 20);
}else if (page==85) {
lession1= Lession1Service.selectListByLimit(80, 20);
}else {
lession1= Collections.singletonList(new Lession1(0,"0"));
}
return lession1;
}
@PostMapping("/lession2")
public List<Lession1> anti2(HttpServletRequest request) throws IOException {
List<Lession1> lession1=null;
HttpSession session = request.getSession();
String key=null;
Cookie[] cookies = request.getCookies();
if (cookies!=null) {
for (Cookie cookie : cookies) {
if ("PHPSESSID".equals(cookie.getName())) {
key = cookie.getValue();
break;
}
}
}else {
lession1= Collections.singletonList(new Lession1(0,"0"));
return lession1;
}
Object arvin = session.getAttribute("Arvin");
if (arvin==null){
lession1= Collections.singletonList(new Lession1(0,"0"));
return lession1;
}else {
session.removeAttribute("Arvin");
}
ServletInputStream inputStream = request.getInputStream();
byte[] bytes = new byte[1024];
int len=0;
StringBuilder sb = new StringBuilder();
while ((len=inputStream.read(bytes))!=-1){
sb.append(new String(bytes,0,len));
}
String s = sb.toString();
String page="1";
String privateKeyHex = "e644268b38f6805dfd45b237f592d0fd29c40f8da8df3533ec91cceeed553e06";
try {
String decrypt = SM2Utils.decrypt1(privateKeyHex, s);
byte[] bytes1 = Base64.decodeBase64(decrypt);
page = new String(bytes1);
}catch (Exception e){
lession1= Collections.singletonList(new Lession1(0,"0"));
return lession1;
}
if (page.equals("1")) {
lession1= Lession1Service.selectListByLimit2(0, 20);
}else if (page.equals("22")){
lession1= Lession1Service.selectListByLimit2(20, 20);
}else if (page.equals("44")){
lession1= Lession1Service.selectListByLimit2(40, 20);
} else if (page.equals("65")) {
lession1= Lession1Service.selectListByLimit2(60, 20);
}else if (page.equals("89")) {
lession1= Lession1Service.selectListByLimit2(80, 20);
}else {
lession1= Collections.singletonList(new Lession1(0,"0"));
}
return lession1;
}
}
|